Friday, March 29, 2013

SEM Blog Hop

Welcome to the Scrapping Everyday Miracles Blog Hop!  I hope you are enjoying getting to know the design team.  If you are just joining the hop here, you will want to go to the SEM blog and start from the beginning.

We are sharing projects that have to do with spring or Easter and today I have a layout I created for my daughter's album.  I made a photo collage of several of the Easter activities she participated in over the course of about a week.  I downloaded the collage from the Scrapbooks Etc. site and added my photos in Photoshop Elements.  The papers on this layout are mostly Dear Lizzy Neapolitan with a little 5th and Frolic thrown in.


The scrap twist was to use flowers or florals so I fussy cut the flowers from a sheet of 5th and Frolic paper and then added a rose brads and crocheted flowers I received a couple of years ago as a RAK.

The title was cut with the Cricut. The word "Easter" was cut with the Cricut Classic Font cartridge and the word "Blessings" was cut using Sure Cuts A Lot.

What do you love most about spring?
I love how the world "greens up" and watching the green plants poke from the ground and the buds on the trees.  A bible verse that makes me think of spring and nature is Matthew 7:30- "God so clothes the grass of the field, which grows today and is thrown in the oven tomorrow, will he not much more provide for you, oh you of little faith?"  I love the imagery of the grass and the reminder that God always provides; a reminder I need frequently!

Where do you live?
I live in a suburb of Minneapolis in Minnesota, so you can bet I am looking forward to spring.  It is starting to feel like it will never come!  It's crazy to think that last year on St. Patrick's Day it was nearly 80 degrees and this year there was still a thick layer of snow on the ground- the joys of Minnesota weather!

I am giving away a small prize.  I have a 6x6 pad of Stampin Up Designer Series patterned paper and 2 sheets of rubons.  To be eligible, just leave a comment about how you celebrate Easter/Spring.

There is also a prize on the SEM blog, so you will want to head over there and comment so you can win that! You have until April 6th to complete the hop and be eligible for the prize.

Your next stop on the hop is Tracey Gregory's blog...

And here's the complete blog list:


Materials- 
Cardstock- The Paper Company
Patterned Paper- American Crafts
Journal Card- October Afternoon
Brads- Making Memories
Rub ons- K and Company, Art Warehouse
Glitter- K and Company
Ink- American Crafts, Ranger, Clearsnap, Tattered Angels
Sticker- Fiskars
Tape- Target
Mask- Studio Calico
Glitter Glue and Liquid Pearls- Ranger
Pen- Zig
Die Cutter- Provo Craft
Cartridge- Cricut Classic Font
Software- Craft Edge, Adobe
Font- FLW Script
Collage- SBE Quck Collage #102
Thursday, March 28, 2013

I Feel the Love- March

No, I did not forget!  I made a card for the IFTL project this month.  March's recipient is a beautiful little girl named Claire who was diagnosed with cancer the day after Christmas.  You can read more about her here.

Life has been a little hectic, so this was a pretty quick card.  I pulled out my "card kit" file with coordinating papers and went to work.  I also did this for the current Bitten By the Bug challenge which was to use a Cricut card cut.  The card I chose is from Tags, Bags, Boxes and More 2.  The sentiment is from the Live Simply cartridge.  The papers and stickers are Cosmo Cricket DeLovely, such a bright and cheery line!


Name Sign Tutorial

Today I am sharing the name signs I have made for my kids over at Scrapping Everyday Miracles.  A few years ago, I was inspired by an article in a magazine by Jessica Sprague to make a sign with clothespins to hang my children's artwork.  I tweaked the idea to work with what I had available and have now made 4 of these signs, one for each of my children.  Here is how I do it:

Materials:
wood sign
wood letters to spell out name
2 clothespins
patterned paper
acrylic paint (2-3 colors)
scissors
foam brush
Mod Podge
sawtooth hangers
pencil

Step 1
Trace letters onto the back of patterned paper.  I used patterned paper on every other letter, but you could do it on all of your letters.  Cut out letters.


Step 2
Paint sign and letters.  I paint the edge of the sign a different color than the face.  I painted the letters the same color as the edge of the sign or a third color, just not the same color as the face of the sign.  Any letters that will have paper on their face only need their sides painted.


Step 3
Attach sawtooth hangers to back of sign.  It is much easier to do this before you add the letters to the front of the sign, trust me.  :)


Step 4
Paint the clothespins.  I try to get all of the surfaces.


Step 5
Attach paper to the front of the letters using Mod Podge.  Coat the letters with Mod Podge to seal them.


Step 6
Make die cuts to decorate the face of the sign.  For this sign I made lizards in three sizes using my Cricut.  Attach them to the sign with Mod Podge.  Seal the sign with at least 2 layers of Mod Podge.  Let dry.


Step 7
Once the Mod Podge is dry, attach the letters and clothespins to the sign using wood glue.


Here is the final product, hanging on the wall!


To see the other three signs head over to Scrapping Everyday Miracles!


Tuesday, March 26, 2013

Monday, March 25, 2013

Christmas Carol Party- NAS #258

It's Monday, which means a new sketch at Nuts About Sketches.  This week it is a single page sketch with space for lots of photos- just my style!

I decided to make a layout about a Christmas Party we went to a couple of years ago.  The twist on this party was that you were supposed to dress up like a Christmas Carol.  My husband, brother-in-law and I dressed up as "We Three Kings."  

This page came together pretty quickly.  I used a mask I bought recently.  I used it with spray mist on the cardstock and with modeling paste on the patterned paper.  


I fussy cut the ornament from a sheet of We R Memory Keepers paper, as I have done several times before.  I decided to write my journaling directly on the layout because I didn't want to cover up the patterned paper.  

I've seen several layouts recently with elements that were recessed.  I decided to try that on this page.  I cut the circles from the red patterned paper and then adhered my photos to the cardstock while lining them up with the holes.  To raise the patterned paper, I used a piece of chipboard under the entire patterned paper. I cut the same holes into that and then adhered the paper to the chipboard.  It turned out looking a little like a picture frame.

Materials- 
Cardstock- Bazzill
Patterned Paper- Echo Park and We R Memory Keepers
Brad- Deja Views
Dew Drops- Robin's Nest
Stickers- Echo Park
Rub ons- Daisy d's
Mist- October Afternoon
Molding Paster- Golden
Chipboard- Making Memories
Pens- Zig, Sakura
Mask- Studio Calico
Ink- Ranger
Vellum- JoAnn Crafts

Sunday, March 24, 2013

Scavenger Hunt Sunday 3-24-13

Well, it's another late Sunday scavenger hunt post and we've had a busy weekend, so I'm going to be quick.

Asian
That's my nephew in the middle.  His dad is Chinese.  My sister-in-law and her two youngest came to visit early this week to help celebrate my brother-in-law's engagement. 


Wavy
My oldest used to have really curly hair, now it is just wavy.


Draw
My two middle kiddos playing a game with their other cousin.  The game involved drawing plastic monkeys from a bag.

Soft
My little guy after taking a bath.  Soft baby skin, soft towel.


Texture
I made ice cream play dough with the kids on Friday.  It had an interesting texture.


Saturday, March 23, 2013

More Sunshine Mail!

I have two more cards to share from Card Making Day for the Sunshine Mail Foundation.. For the first, I used the current sketch at Cardabilities and My Mind's Eye ” On the Bright Side”.
This is by far the smallest I've cut anything using my Cricut, but it actually turned out okay.  The "happy" was cut using the "Walk In My Garden" cartridge and the "hello" was cut from "Tags, Bags, Boxes and More 2" cartridge.


This final card was made with the Dear Lizzy Neapolitan collection.  I was once again inspired by the jar paper and copied my idea from my May calendar page from last year and did the floating flowers and hearts.  The bracket shape for the sentiment was cut with the "Storybook" Cricut Cartridge.

Friday, March 22, 2013

My Mind's Eye Birthday Cards

A couple of months ago, Archiver's had a couple of My Mind's Eye Lost and Found 6x6 pads for $.99. I ended up getting there a couple of days into the deal so the only one left was the Breeze color scheme. It wasn't the one I was hoping to get, but it has turned out to be great for masculine cards. Here are two I've made so far. The first is a birthday card for my dad. I used the current sketch at Practical Scrappers for inspiration.


I used my Stamping Gear to make the large circle. The clock face is a 7 gypsies stamp. I inked the papers on this card with Walnut Stain and Forest Moss distress inks. I covered the click face with Glossy Accents to make it look like glass.

My second card is a birthday card for a friend who will be celebrating his golden birthday this weekend. The design is based on the current sketch at Sketch Saturday. I stamped the words with VersaMark and then heat embossed it with gold embossing powder.


Thursday, March 21, 2013

Retirement Card

I've been busy making some cards for upcoming events.  I will be sharing them over the next few days.  Today I am sharing a fun retirement card I made for my aunt.  I used this week's Unscripted Sketch and the bright K and Company "Berry Sweet" line.


Believe it or not, I had no Lemon Cricut cuts or any other embellishments, so I went to work making my own.  I hand drew the lemon on white cardstock and then cut it out.  I colored it with Wild Honey and Mowed Lawn Distress inks and edged it with Grapefruit American Crafts ink. I covered it with glue and then sprinkled yellow American Crafts Spark glitter over the glue.  I pressed the glitter into the glue so it won't shed. 


I got the idea for the sentiment (which inspired the card design) from the book "Words to the Rescue", which is great if you ever struggle with sentiments for your cards.  I found a tag that coordinated somewhat to put the sentiment on the inside.


Thanks for stopping by and make sure to check back over the next few days to see some more cards!

Tuesday, March 19, 2013

April Calendar Page- NAS 257

It's Monday which means there it's a next sketch at Nuts About Sketches. This week it is a two pager so I used it for my April calendar page.

 I started by making circles on my cardstock with a couple of colors of mists and my Creative Memories circle cutters. This collection of Dear Lizzy papers is getting pretty sparse, but that worked well for cutting out circles for this layout. The cloud transparency made me think of the saying ”April showers bring May flowers” and I like what it added to my background.

I used some DIY Thickers and glitter for my title. I decided to alternate colors to add some interest.

Materials
Cardstock- Stampin Up, The Paper Company, American Crafts
Patterned Paper- American Crafts
Stickers- American Crafts, Doodlebug Designs
Flair- American Crafts
Epoxy Stickers- Fiskars
Stamp- 7 gypsies
Trim- JoAnn Crafts
Glitter- American Crafts
Transparency- Hambly
Buttons- Jesse James and Co.
Pen- Sakura
Ink- Tattered Angels, October Afternoon, Studio Calico
Font- Marker Fine Point Plain


Monday, March 18, 2013

SEM March Sketch- Merry Christmas

Today is the reveal of our second challenge for the month at Scrapping Everyday Miracles.  This time it is a sketch.


I didn't use the suggested photo sizes because I had these four photos already printed and they worked to run across the page so I went with that.  For the focal point photo, I matted it with pink patterned paper and popped it up with foam adhesive to make it stand out more.  After I had attached the large half circle, I felt it needed a little something extra, so used some coordinating paper and created a ruffle.  The paper I used is fairly thick, so to make it more pliable, I spray it with water.


For the title, I used a die cut and added a sticker and my own handwriting to finish the title.  The pink flower was cut in half, layered and then tucked behind the title block which is also attached with foam adhesive.


The scrap twist for this challenge was to use buttons.  I used some chipboard ones, the fancy turquoise and lace one below, and some button brads to accent my page.  The gifts were cut using the Cricut and "New Arrival" cartridge.  The holly is a rub on that I painted with a brush and excess spray ink from spraying the chipboard circle below.

Materials:
Cardstock- Bazzill
Patterned Paper- Recollections
Rubons- DaisyD's
Stickers- Echo Park
Chipboard- Making Memories, Studio Calico
Flowers- Kaiser Craft
Brads- Making Memories, Basic Grey
Button- Recollections
Ribbon- Michaels
Pen- Sakura
Ink- Ranger, October Afternoon
Punch- Martha Stewart Crafts
Die Cutter- Provo Craft
Cartridge- New Arrival
Glitter Glue- Ranger
Sketch- Debbie Gaydos

Sunday, March 17, 2013

Check it Out!

I have a layout published in this month's edition Scrapbook News and Review ezine!  You need a subscription to see it.  You can find it here.

Sunshine Mail

The past several years during Lent I have taken it upon myself to make a card every day and then donate them to Operation Write Home.  This year I have changed it up.  I decided that with a new baby and 2 design teams, it would be too much stress to try to complete a card each day.  Instead, I decided to have a card making day (like I have had in the past) and just focus on making cards that day.  I also decided to try a new organization: Sunshine Mail Foundation.  Sunshine Mail Foundation collects cards, toiletries and art supplies for kids who are in the hospital, homeless or in foster care and could use some "sunshine" in their lives.  You can read more about them by clicking on the link above.  

Yesterday I hosted the Card Making Day and I had 4 friends join me in making cards.  We made a total of 18 cards between us.  For my first card, I used this week's Mojo Monday sketch.

I used some Dear Lizzy Neopolitan collection papers for this card.  The bee was cut using my Cricut and "Walk in My Garden" cartridge.  The trail was made using black stickles.


I will be sharing my other cards later this week!

Scavenger Hunt Sunday 3-17-13

Happy St. Patrick's Day! This week's prompts were related to just that, which was a challenge. We're German with a bit of French descent around here, no Irish blood to be found. So I stretched. A lot.

Lucky
I was "lucky" enough to have a husband and a friend text me when white smoke had been spotted over the Vatican.  I was blessed to watch the new pope revealed to the world.  Here is Nick waiting patiently for the big moment.

Irish
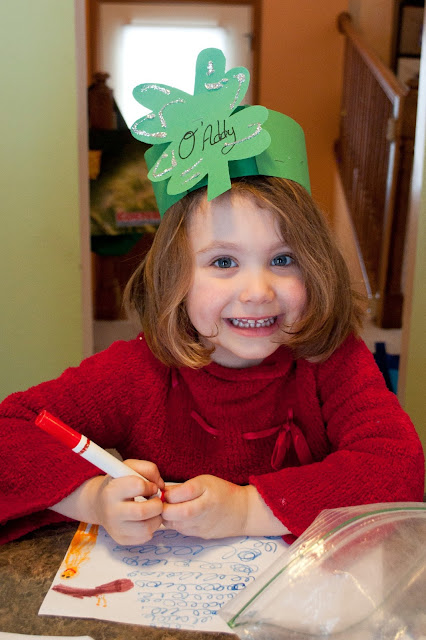
As I said, no Irish blood here.  This is as Irish as we get, a craft from the YMCA.


Daylight
My smiling boy in the sunlight from the windows.  It is bright and sunny here, but COLD! :(


Pot Of Gold
How about bowl of goldfish?

Clover
Continuing on the colored and shaped pancake theme from last month, clover pancakes!