Thursday, December 29, 2022

January 2023 Calendar Page

Hello all! Can you believe 2022 is almost over?? I am here today with my January 2023 calendar page! I started with the double page sketch at Stick It Down:


I stuck pretty close to the sketch on this one. I bought a Christmas Warehouse box from Simple Stories and these are some of the goodies from that box! I started by selecting my patterned papers and die cuts and laid them out on my layout. I used my Cricut and some coordinating cardstock to make the large doily on the left hand page. A journaling spot worked perfectly for my journaling for the month on the left side of my layout. I found some foam Thickers that matched perfectly, so I used those for my title. To mimic the lines down to the ornaments on the sketch, I dripped spray ink down my layout. I think it gives the effect of icicles. I finished off my layout with some brad stickers and Nuvo Drops.

 Thanks for checking out my layout!

Tuesday, December 27, 2022

Birthday card- Stick It Down

Hello again! I have another card to share today. This time it is a birthday card based on the card sketch this month at Stick It Down:


I used this opportunity to use up some scraps for my card. I pulled blues and greens that went together and went to work cutting strips. I used an embossing folder on the background. I then glued the strips down. I stamped the sentiment on a strip with a more subtle pattern before adhering the strip. To embellish the card, I punched some stars and glued on some sequins. 

 Thanks for stopping by to check out my card!

Monday, December 26, 2022

Blessed Easter

Hi all! I have a new layout to share, and yes, I'm way out of season! 😉 These are the photos I have printed right now!

I was inspired by the Love Your Stash Challenge at Lasting Memories: Create a layout and use 3 or more patterned papers, stickers (this can be any sticker - puffy, chipboard, or cardstock stickers), trim (washi tape, ribbon, twine, etc.), punches/die-cuts/ephemera, and finishing touches (enamel dots, brads, sequins, bling, splatters, etc.)

I used Bella Blvd. You Are My Sunshine collection for my papers. They are just so colorful and happy! I found some cut files for the title. For the word "Blessed," I cut the word once from the patterned paper and three times from white cardstock and layered them to give it some dimension. I wanted a border between my two blocks of patterned paper and I again found a cut file, this time a border and used coordinating papers to create it. For my journaling, I found a very old journaling spot and added it to my page. It had a heart in the upper left corner, which would have worked with my layout, but I decided to cover it with a die cut egg. To finish off my layout, I used some puffy stickers.

 Thanks for checking out my layout!

Sunday, December 25, 2022

Anniversary Card

Hello all and Merry Christmas! I have a Christmassy anniversary card to share today. It started with the inspiration image from The Card Concept:


I decided to start with a dry embossed wood background. I found a nice red to match the door in the inspiration. I then used my Cricut to cut the wreaths and sentiment. I attached the small wreaths directly to the background and used foam tape for the larger wreath. For my sentiment, I used pearl embossing powder on a white die cut. I attached the sentiment on both ends to the wreath. To finish off the card, I used pink Liquid Pearls and a short piece of twine to create a bow for my wreath.

 Have a wonderful day!

Sunday, December 11, 2022

Heat Embossed, Inky Backgrounds and Die Cuts

Hello! I have two new cards to share and they have similar designs. for both cards, I started by stamping  and heat embossing the background. Their paths diverged a bit from there, but then I finished them off with die cuts and small embellishments.

First up is an anniversary card. Since we are nearing Christmas, I decided to used this leaf heart background and go for a poinsettia look. I colored the heart with two colors of red/pink watercolor pencils and the used a water brush the blend the color. For the outer leaves I used two greens. To add a bit to the center heart, I colored around the leaves with a light blue watercolor pencil and then blended the color with a Wink of Stella shimmer pen. I used my Cricut and a couple of specialty papers to cut the sentiment. I finished off the card with some blue and green pearls and gems.


My second card is a birthday card for my nephew. I again began by stamping and heat embossing the background. I then pressed Distress Oxide inks onto the cover of my Misti and sprayed them with water. I pressed the panel into the ink and let it dry. I repeated this a few times to give the background depth. I again used my Cricut to cut the basketball and number. The number got a little to close to another cut that had been done in the paper and so the bottom right corner was missing, hence the punched star. I finished off this card with some iridescent foil stars.


Friday, December 9, 2022

16th Birthday Card

Hi all! I have a new card to share with you. This one was for my daughter's 16th birthday! I started with this sketch from Sketch Saturday:


I went through my scraps for the patterned paper pieces and found some that worked together. I used a sheet of silver paper and ran dry embossed it to look like tire tracks. For the keys, I cut them using my Cricut and then heat embossed them with silver 3 times to give them some depth and shine. I tied  some twine around the ring  and stamped and heat embossed the sentiment to finish off the card.


Sunday, November 27, 2022

December Calendar Page

Hello all! I have my December calendar page ready to share today! I used this month's double page sketch from Stick It Down:


I made the photos larger on the left hand page for two reasons: 1-so there was more photo and less white space and 2- to accomodate some landscape and square photos. Because of the size of my photos, I had to move to title. I used papers from a couple of Christmas collections. My journaling in on the remnants of a lined sheet of patterned paper. I used a Cricut cut for my title. To embellish the page, I used a canvas deer, some brads, tags and stickers.

 Thanks for checking out my layout!

Wednesday, November 16, 2022

Cards!

I have several cards to share today. As I was uploading them, I realized that 4 of them have the same basic design- centered main element and sentiment. This is a design I go back to over and over and it works. 

First up is this masculine birthday card. I started by embossing the background paper with an embossing folder. I then rubbed a gold ink pad over the background to give it some interest. I cut the green leaves with my Cricut and attached them with glue. I stamped and heat embossed the sentiment on the same color of cardstock. I finished things off with Nuvo drops.


Next is a confirmation card for my daughter. I made a huge mess making this one! I started by inking Versamark through a swirl mask. Then I used Stamp and Bond Embossing powder. Once I had heated the powder, I poured the red glitter over it. I tried to heat the powder while pouring the glitter- I don't recommend this, I ended up with glitter EVERYWHERE! There weren't enough scrolls after the first time, so I used the mask and ink and added more. I went over it all at the end to help the glitter get better adhered to the card. I cut the cross using my Cricut, and, like the card above, stamped and heat embossed my sentiment.

This card is like the one I made in this post, I just used different colors and stamps.


I played a bit with alcohol inks on this next card. I dropped colors onto some Yupo paper. Once they were dry, I used a plaid stamp and Lift Off ink. I didn't stamp it straight, so wen I attached it to the card, I adhered the paper at an angle that made the lines straight. I stamped and heat embossed the pig on watercolor paper and used Distress Inks and a water brush to color it in. I stamped and heat embossed the sentiment for this card as well. I finished things off with some gems.


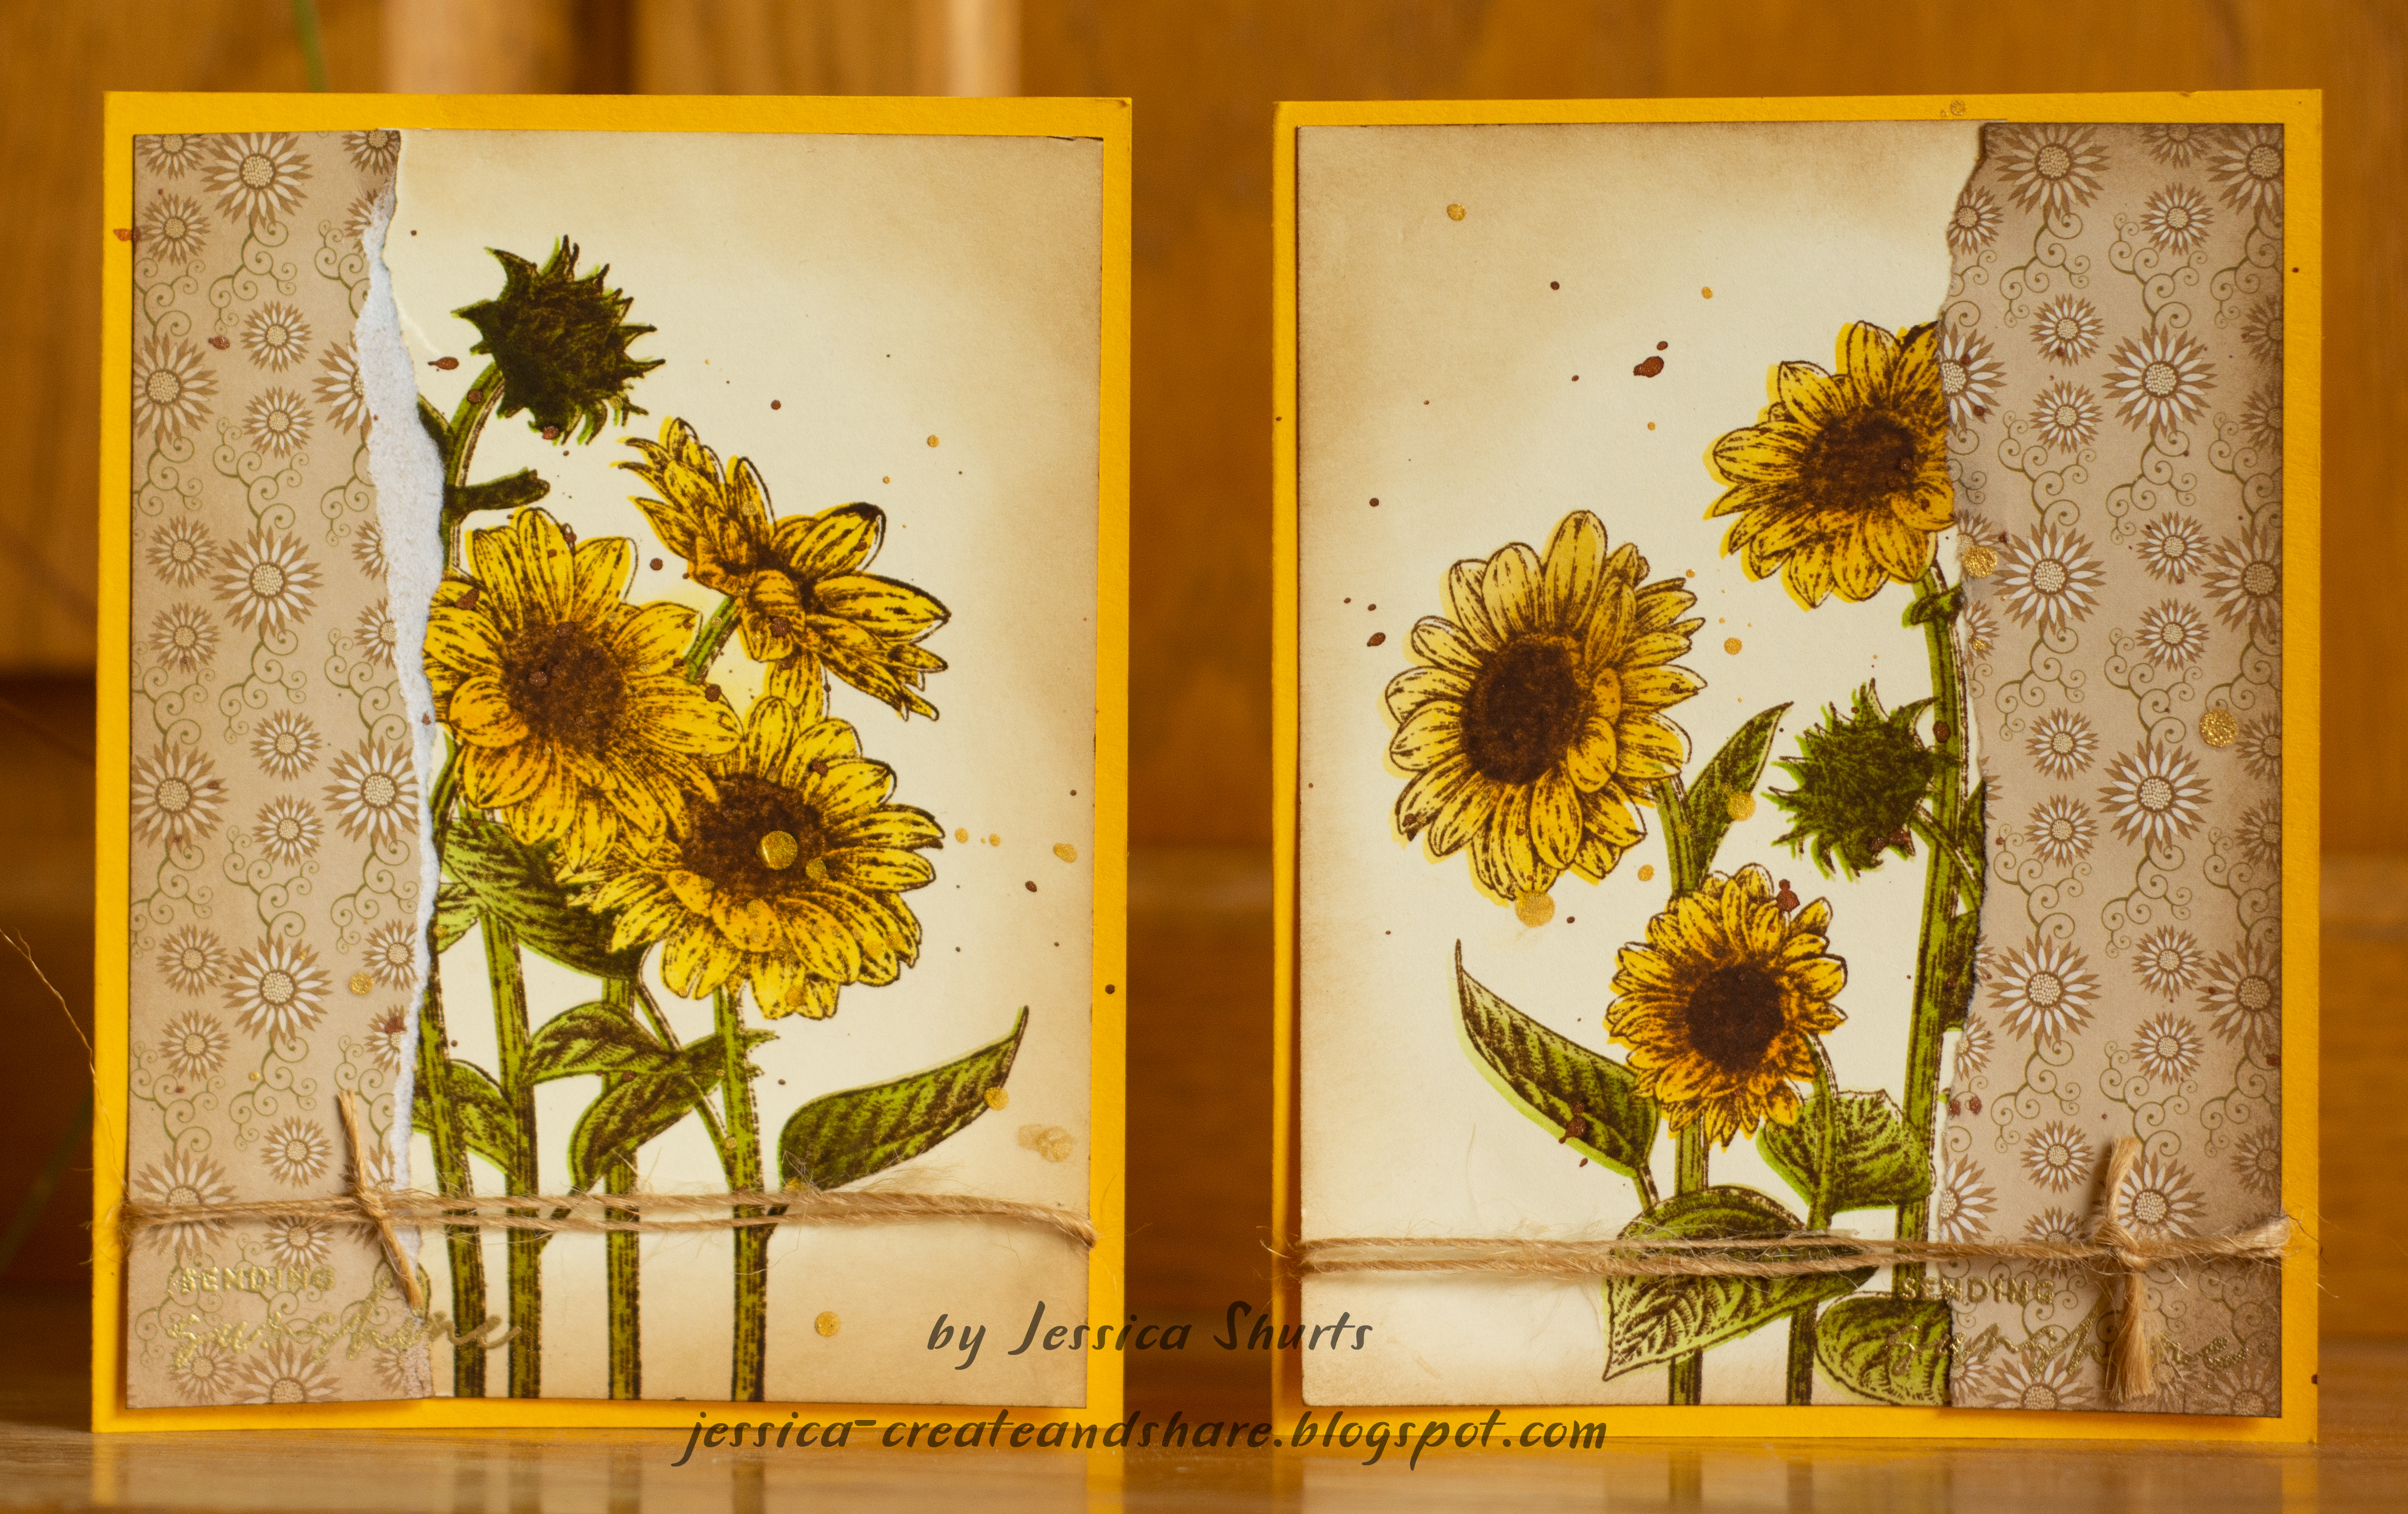
Finally, this card has a bit of a different design. I used the layering stencils that came in the Simon Says Stamp October Card Kit. You can see when I used them the first time here. This time I just used the stencils and didn't use the outline stamp. I really like the abstract look that gives to the flowers. I splattered some brown Glimmer Mist over the card before cutting out and attaching the sentiment. To finish things off, I added a piece of twine.


Tuesday, November 15, 2022

November Calendar Page

Hi all! I'm finally getting caught up on all the things that fell by the wayside last month while I was busy taking and editing photos! Today I am sharing my calendar layout for the month.

I used the October double page sketch from Stick It Down:


I stuck really close to the sketch this month and just swapped out one of the photo spots for more journaling. I used papers and stickers from Echo Park to make this page. I used a digital journaling card from Scrapbooks and Cards Today and then created another one with a solid blue box to coordinate with it. I typed my journaling on them in Photoshop Elements and printed them out with my photos. For my title, I cut the word with my Cricut from patterned paper and two layers of white cardstock. I stacked the letters to create some dimension. There was a acorn border sticker in this collection and I cut the acorn from the sticker to create a place to put the date for each photo. I added stickers, sequins and Nuvo Drops around my embellishment clusters to finish off the page. 

 Thanks for stopping by to check out my layout. Tomorrow I'll be back with some cards I made earlier this month!

Saturday, October 15, 2022

Brithday Cards

I made a couple of cards this week for some upcoming birthdays using the card kit I bought from Simon Says Stamp last month. I started with the included embossing folder. I pressed a Distress Ink pad onto the flat part of the indented side and then misted it with water. I used watercolor paper and put it in the folder and ran it through my machine. I love the color and depth this gave to my backgrounds! 

For the first card, I used a kraft tag that was also included in the kit and stamped and heat embossed the flower to match the background. I colored in the flower with the white Wink of Stella pen. I stamped and heat embossed the sentiment in silver and wrapped the tag with the included twine. I then attached the tag to the card.


For my second card, I stamped and colored the cute little cat from another kit. I fussy cut that and attached it to the background using foam tape after splattering the background with some clear Perfect Pearls ink and pink spray ink.

 Thanks for stopping by to check out my cards!

Friday, October 14, 2022

October Calendar Page

Hi all! I'm here to finally share my October calendar page. It has been done for a while, but I've been so busy that I didn't have time to get it up on my blog! I used the September double page sketch from Stick It Down:


I started with kraft cardstock for my bases. I used molding paste and a stencil to add a pattern and texture. I then used spray inks to add some color with spritzes and splatters. Once that was dry, I layered the patterned papers over the top. I found a green cardstock that went with the greens in the papers (it may be slightly too bright looking at it now, but that's what I used) to mat the photos. I used a journaling stamp and a pen to add my journaling to the page. I found letter stickers that coordinated with my colors fo the title. To embellish the page, I fussy cut items from the fussy cut sheet in the collection and added them to the layout with regular adhesive and foam adhesive for some dimension. I finshed off the clusters with some Nuvo Drops in Dirty Bronze.


 Thanks for stopping by to check out my layout!

Thursday, September 29, 2022

Happy Birthday- Sketch Saturday #710

Hi all! I have a couple of cards to share that I created using the current Sketch Saturday sketch:


I started wsith the Concord and 9th triangle turnabout stamp and created the fun triangle background. I then went through my stash of scraps to find a coordinating patterned paper. I layered those on my card front. For the oval element, I used my Cricut to cut a cluster of balloons. I added those to my card front with foam tape for dimension. I stamped and fussy cut the sentiment banner. I used some embroidery floss to make the balloon tails. I finished off the card with a sprinkling of sequins.


 Thanks for stopping by to check out my card!

Wednesday, September 28, 2022

Sending Sunshine- Card from a kit

Hi all! I have a pair of cards to share today! I was inspired by the single page sketch at Stick It Down:


I was also inspired by the left column of the Tic Tac Toe Challenge board:


I recently bought the Simon Says Stamp October Card kit (it looks like it is already sold out). I went to work with the included stencils and stamps when I received it. I used the layering stencils to blend the color for the flowers and then stamped the lines over the top. I didn't get things lined up quite right, so there is a little shadowing in spots. I will have to try another technique next time. The set makes a 6x6 image, so I cut it in half to make two cards. I had this really old brown sunflower paper that I used to layer over the edge to complete the card front. I used Walnut Stain Distress ink and inked the edges of my panel. I took brown and gold spray ink and added some splatters. It is hard to see, but I stamped and heat embossed "Sending Sunshine" in the bottom corner of my card and then tied some twine above it.


 I am really loving these sunflower stamps and I am looking forward to playing with the images more in the future!

Saturday, September 17, 2022

Easter Baby

Hi all! I have a new layout to share today! I started with this sketch from Rochelle Spears:


I used the sketch for the left hand page of my layout. I decided to take the patterned paper strips all the way across my layout to bring some continuity to the two pages. I used a cut file that I backed with patterned paper to fill in the gap on the left page. For my title, I combined stickers from the collection I used and a cut file. I found some really old jounaling spots that coordinated with the colors of my layout. To embellish the layout, I used stickers, enamel dots, and Nuvo Drops. 


 Thanks for checking out my layout!

Friday, September 16, 2022

Anniversary card

Hi all! I'm sharing a card I made last week. I started with this sketch from Sketch Saturday:


I started with the shimmery purple cardstock and worked from there. I decided it would look nice on black cardstock, so that's what I used for my background. I layered the purple cardstock and embossed vellum over the top of that. I used a layering stamp set for the flowers and then fussy cut them. I also stamped the sentiment strip. I tied a piece of gold twine around the purple cardstock and vellum before attaching them to the background. Then I layered the flowers and sentiment on with regular adhesive and foam adhesive. I finished the card off with some Liquid Pearl dots. 


Wednesday, September 14, 2022

Happy Birthday card

Hi all! I have a card to share that I made for my husband's birthday today! I started with this Tic Tac Toe board:


I was also inspired by the sketch and inspiration photo from Fusion:

I came up with this using the top row of the tic tac toe board: masculine, orange/rust, and sentiment. I started by finding the orange and brown papers. I then played around a bit with the strips of patterned paper and my scoring board to make the pinwheels. I attached the pinwheels to the kraft cardstock with a combination of tape runner and liquid adhesive. I laid that on top of my brown panel and decided to add a little interest by scoring the outline around the kraft panel. I punched a hole through the kraft piece in the middle of the pinwheels and put bronze brads through. I stamped and heat embossed the sentiment with bronze embossing powder, fussy cut the banner and used liquid glue to attach it to my card. 

 Thanks for checking out my card!

Thursday, September 8, 2022

Dance

Hi all! I have a new layout to share! Paper Issues has a bracket challenge competition going on right now in their Facebook group and I decided to try a layout with a repeated title.

I started by selecting some patterned papers to go with my photos. My daughter had the cute rainbow colored tutu, so I went with fun bright colors for my papers. I chose a black background to make the colors really pop. For my title piece, I went to work in Cricut Design Space and found some outline fonts and welded them together in the software. Once I had the piece cut, I put it on an old Cricut mat that had lost a lot of its stick, but was stickly enough to hold all the pieces in place. Then I took my shimmer watercolors and painted streaks over my words in coordinating colors. Once it was dry, I peeled it off the mat and adhered it to my background. I layered the photo of my daughter and the program from one of her shows over the top of the title piece. I found a journaling spot in a matching pink and did my journaling on there and adhered it under my photo. For embellishments, I used some stickers, wood button, epoxy flair and fussy cut flowers. 


 Thanks for stopping by to check out my layout!

Monday, August 29, 2022

September Calendar Page

 Hi all! We're getting close to the end of the month which means it is time for me to share my calendar page! I started with this sketch from Stick It Down:


I decided to use a sheet of patterned paper and a sheet of kraft cardstock as the bases of my pages. All of the patterned paper is from Shimelle's Never Grow Up collection. Since most of the photos this month are outdoors, I used the outdoorsy papers. I used a cut file in place of the doily on the left hand page. For my journaling, I used some digital journaling spots and typed my journaling on them in Photoshop Elements. I printed them on kraft cardstock to match my layout. I used my Cricut to cut out the title. It is hard to tell from the photo, but the title is cut from shiny silver cardstock and then backed with kraft. I embellished the page with stickers, rub ons, fussy cut leaves and flowers, and enamel dots. 


 Thanks for stopping by to check out my layout!

Monday, August 22, 2022

Birthday Cards From a Kit

Hi all! I have a few cards to share today using the June Card kit from Simon Says Stamp (sorry, it's no longer available!). For my first card, I used the current card sketch from Stick it Down


I started with the rainbow wavy paper for the background and found the little cut apart rectagle for the sentiment. I then found the green wood grain paper for the bottom half of the card. Initially, I didn't line up the grass line of the small panel with the background on purpose, but decided I liked the continuity it created. I matted the small panel to make it stand out against the background. For the clouds, I stamped and fussy cut them befor layering them onto the background. I finished the card of with some iridescent gold stars.


The next few cards used the patterned papers that were included in the kit paired with the stamp set. I loved these cute bunnies, so I started with that for my main panel. I stamped the sentiment on a scrap of the green cardstock I used for my card base. I wanted to add some dimension, so I fussy cut the butterflies from another piece of paper in the kit. I finished off this card with a few drops of Stickles.

This card started with the balloon patterned paper, I chose the cute bunny and balloon stamp to layer on top. I colored the stamped image with watercolor pencils and blended the color with a water brush. I stamped the main sentiment directly on the background and decided to add the smaller sentiment onto the balloon. To add some sparkle, I used the yellow Stickles gel included in the kit to add sparkle to the balloon. The cat was attached to the card with foam tape for dimension.

My final card started with the painted squares background. I added a strip of punched coordinating cardstock across the bottom for interest. The sentiment panel and clouds were stamped on white cardstock. I fussy cut the clouds and ran a black inkpad over the edges of the sentiment panel to give it an outline to match the cloudes. I layered everything onto the card, lifting some layers with foam adhesive. I finished things off with more of those iridescent gold stars.

 This kit has been so fun to create with! I have some bits and pieces of the papers left and of course the stamp set, so you will be seeing a bit more of this kit in the future!

Tuesday, August 9, 2022

August Calendar Page- Stick It Down

Hi all! I'm a little behind getting this posted, but here it is, my August calendar page. I was inspired by the July double sketch at Stick it Down:


I stuck pretty close to the sketch. I used papers from a couple of Vicki Boutin's recent collections. I love the fun bright colors of these papers. I used a cut file from Paper Issues for my title. To embellish the page, I used die cuts and stickers from several different companies and collections. I've found journaling on strips works really well for these pages, so that's what I did here.


 Thanks for stopping by to check out my page!

Monday, August 8, 2022

Birthday card- Sketch Saturday and Tic Tac Toe Challenge

Hi all! I will be sharing some projects over the next few days that I have made in the last couple of weeks. First up, is a card inspired by the current Tic Tac Toe board and Sketch Saturday sketch:


I did the middle row of the tic tac toe board: balloons, birthday, and twine. I went a little abstract with this one since it was for my 14 year old nephew. I pulled some colors of Distress Oxide inks and these scribble and blot stamps. I used the sketch as inspiration for the placement of my circles. for the green balloon, I used a circle cutter to cut it out and foam tape to attach it to my card front. I stamped the sentiment and edged the piece in the same color to help it stand out a bit from the background. I found some coordinating twine and glued it on like a balloon string.  I finished off the card with some Liquid Mercury Nuvo Drops.


Monday, July 25, 2022

Sunday School- Lasting Memories Guest Designer

Hi all! It is my last week as guest designer at Lasting Memories. This week's Opposites Attract challenge is to make a layout that uses hot and cold, summer and winter, or night and day. I ended up picking summer (spring) and winter. 

I scrapped photos from my daughter's Sunday school programs when she was 5. I have two photos from the Christmas program and two from the Spring program. I found some patterned papers that went with the Christmas and spring themes and ran those diagonally across the corners of my layout. I used gold embossed washi tape as a border on each paper. I then placed her certificate in the middle as my title and journaling. To embellish the page, I used some stickers, die cuts, flowers, brads and gold Liquid pearls and layered them up.


 I typically have a more elaborate title for my layouts, but I felt the certificate did enough explaining and added enough text that I went with that. This is a little different than what I typically do, but it's fun to try something different every once in a while. 

Thanks for stopping by to check out my layout!