Friday, June 30, 2023

July Calendar Page- Stick It Down

Hello! I have my calendar page for July. I started with the double page sketch from Stick It Down:


I started by doing some ink smooshing and splattering on a sheet of white cardstock for the left hand page. While that dried, I chose papers for the strips down the sides. I ended up adding another column of photos on the right hand page so I coule include some more. I recently picked up a stamp set that stamps tickets and came with a coordinating punch so I used that for my journaling.  I used my Cricut to cut the title and then backed it with patterned paper. To embellish the page, I used some stickers, flair, and some punched stars from a previous project. 

 Thanks for stopping by to check out my layout!

Wednesday, June 28, 2023

Playing With New Products!

Hi all! I have a few more cards to share today! I ordered some stamps from Concord and 9th a few weeks ago when they had a sale and they arrived this week!

First up is the Marbled Turnabout Stamp. I thought this one was so cool when I first saw it, so when I saw it was part of their sale, it went in my cart! I used blues and greens on pearl cardstock to create this background. I am excited to try some different colors with this one. I cut the sentiment with my Cricut. To highlight the number, I colored over the numbers with a  green metallic pen. To finish off the card, I made a bow with sheer green ribbon and then added some bronze brads.


Next up is the Butterfly Love Turnabout Stamp. As I was perusing the sale, I came across this one and loved the pattern this set created. I made one 6x6 panel and cut it in half to make two cards. For the first card, I used my tried and tested design of adding another paper to finish the card front and then running a piece of ribbon over the seam. The large butterfly is included in the set and I stamped it in pink and then with versamark so that I could heat emboss it with glitter powder. It turned out so pretty! I stamped the sentiment of some purple cardstock and made it into a little flag. To finish off the card, I added some white and clear sequins.

I trimmed the other piece of the panel down and decided to run it down the center of my card front. To add some interest to the cardstock background, I stamped the edges with a floral background stamp that I picked up at a scrappy garage sale last week and heat embossed it with glitter powder. I used the same technique as above for the big butterfly. I stamped and heat embossed the sentiment (from another set) and attached it to my card front. I then tied some baker's twine around the whole panel.

 This is another set I am excited to try other techniques and colors with in the future!

Tuesday, June 27, 2023

Floral Cards, Playing with Products

Hello! I have two more cards to share today! I played with some products I've had for a bit to try something new. First up is a pair of birthday cards. I started by using a set of layering masks and colored the flowers. I did a little blending of the greens to give the leaves a fun effect. I then cut the panel in half and decided to make slimline cards. I used the strips that I cut off the edges of the panels I created for these cards across the bottom of this card. I stamped the sentiment on the top strip. To finish off the card, I added some light green Nuvo Drops and yellow Stickles to the middle of my flowers.

 
Next up is an anniversary card. I wanted to use my new Cricut pens again, so I used them to draw the background for this card. I then took some metallic watercolors and a water brush and colored in some of the leaves. I also used my Cricut to cut the flowers and the sentiment. After I had attached the flowers and sentiment, I added some irridescent gold pearls to the centers of the flowers.


Monday, June 26, 2023

Father's Day card- Stick It Down

Hello again! Today I am sharing the cards that I made for my dad and father-in-law for Father's Day. I started with this sketch from Stick It Down:


I started by making the alcohol ink background. I used different blue inks and just played around with techniques. Then I used Lift Off Ink and a background stamp to lift the ink off. I stamped the ink off on a piece of cardstock that I have saved for another card. I placed the panel on a white notecard, but the plain white was too stark, so I used a plaid background stamp and blue ink to stamp on the card. For the circle, I cut the circle and three people using my Cricut. The three people were cut from vellum to give them an airy feel. I had just bought a big set of Cricut pens and I used the dark blue one and my Cricut to write the sentiment. It accentuate where the pattern ends on my alcohol ink background, I wrapped some baker's twime around the panel. 

 Thanks for checking out my card!

Sunday, June 25, 2023

Three Occasions, Same Card Design

Hello! I have several posts coming to you the next few days as I catch up on sharing the cards I've been making. First up are 3 cards I made back in May when I made a whole bunch of cards. For these, I stamped and heat embossed a flower image on watercolor paper and then pressed it into watered down Distress Inks. I was somewhat strategic in the placement of the colors on these cards- blue near the top, yellow through the middle on the flowers, and green on the bottom on and around the leaves. I then cut each image in half and added it to a card with a strip of coordinating green cardstock. I added a piece of satin ribbon over the seam. To give it the free form ruffled look, I ran a line of tape runner adhesive down the seam and then ran a line of glue over that. I bunched and pressed the ribbon onto the adhesive. The tape runner held the ribbon in place immediately and the glue held it more permanently. I then added the sentiments when I decided what the cards would be for.

First up is a birthday card. This sentiment fit perfectly on the cardstock strip, so I stamped it there in green ink to give a subtle tone on tone effect.


Next is a sympathy card. For this one and the next one I stamped and heat embossed the sentiment on the flower panel.
 The final card is an anniversary card and I used the same technique for the sentiment.

 I have one left of these, I will share it when I use it!

Wednesday, June 7, 2023

Teacher Thank Yous- Batch Making cards

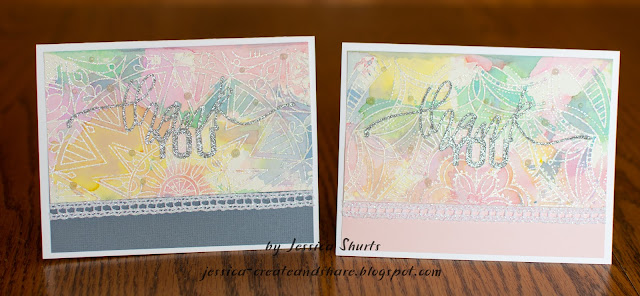
Hello, I have some more cards to share today! This time it is a bunch I made at the same time for my son's preschool teachers and helpers. I wanted something pretty, but also easy to make a bunch of. I started by stamping my background stamps on 6x6 pieces of watercolor paper and heat embossing it with pearl embossing powder. I then pressed individual colors of Distress Oxide ink onto a plastic sheet, misted it with water and pressed the papers into the color. I let each color layer dry before adding another color to prevent the colors from mixing too much and becoming muddy. This process took the longest, but I just had it set up on my desk and did a color, walked away and did something else around my house, and then came back and did the next. Once I was satisfied with the color, I trimmed them down to fit on the front of the cards. I got two card fronts from each 6x6 piece by cutting it in half and then trimming off the ends to make it 5.25" long. (I saved the strips I cut off to make a card in the future.) I found some coordinating cardstock to add to the bottom of the card to cover the rest of the card front. I added white glitter trim to the seam.


For the sentiment, I used my Cricut and silver glitter cardstock. I added a few silver glitter 3D paint dots around the card fronts. Below you can see the two different background stamp patterns.

I have a few extra available for quick cards when I need them. I will share those when I use them!


Tuesday, June 6, 2023

A Few Cards...

Hello again! Today I am sharing three different cards I made over the last few weeks for a birthday, a baptism, and an anniversary.

First up is a card I made for my son's 5th birthday. He is a big Mickey Mouse fan, so I found a free cut file online and uploaded it to Design Space. This particular file had the black layer as an outline. For files that have thin areas like this one, using vinyl is a great solution. The vinyl holds up better than paper when it is cut thinly. The rest of the pieces fit into the outline like a puzzle. For the background, I took a piece of blue cardstock and used a mask and a slightly darker shade of blue ink to ink blend the stars. I stamped and heat embossed the sentiment and finished off the card with some gold foil stars. 


Next up is a baptism card for our niece. I started with a sheet of Whitewash Core dinations cardstock. I ran it through my embossing machine with a folder and then sanded the raised areas to reveal the colored core. I used a cut file for the candle and flower border. I layered teh flower border over a strip of vellum and added gems to the center of each flower to add some sparkle.

Finally, I have an anniversary card. I tried another technique with this embossing folder. I embossed the cardstock and then misted it with water. I used a paint brush to spread Perfect Pearl powder over the flowers while the paper was wet, rewetting when necessary. Perfect Pearls has a bonding agent in it, so it will stay put once dry. I added yellow Stickles gel on the flower centers. I finished off the card front with a stamped and heat embossed sentiment.


June Calendar Page- Stick It Down

I finally have my June calendar page finished and ready to share! I started with the the May double sketch from Stick It Down:


I started by doing some smooshing with spray ink and water on my background papers. I used Foundations paper for my left hand page since I used a lot more ink on that one. I just used white cardstock on the right hand page since I just picked up the leftover drops of ink. Once that was all dry, I added some patterned paper bits to the background. I switched up the photo sizes a bit to fit on mor photos. I also spread my journaling all over the page since there was a lot of it. To embellish the page, I used some die cuts, stickers and enamel dots. I used chipboard letters for my title and then cut the subtitle using my Cricut since there were a lot of "e's" in the words. "COVID" is in letter stickers. To prove my subtitle (technically, not "everyone", but 4/7 of our family), I underlined my journaling where it talked about different family members testing positive for COVID. It was a crazy month!

Thanks for stopping by to check out my layout!

Monday, June 5, 2023

Happy Birthday card

Hello all! It's been a while! The end of May got crazy and blogging took a back seat. I will be back the next few days to share the projects I've created over the last few weeks. First up is a birthday card for my niece that was inspired by the color challenge at Color Dare:


I chose melon, desert rose, wisteria, and ballerina to use on my card. I started my card by stamping the herringbone background on cardstock and heat embossing it in white. I then used a few gelatos to paint in the rectangles. Once that was dry, I cut the sentiment using my Cricut. To finish off the card, I glued on a sprinkling of melon colored sequins.


 Thanks for stopping by to check out my card!