I've done a few more layouts and a card in the last few days and in the process completed 3 challenges.
The first was for the Technique Challenge at Challenge Masters. The challenge was to heat emboss. I have two sets of Halloween stamps that don't get a lot of use, so this was a great excuse to get them out and use them! The vines, phrase "Chills and Thrills" and spider were all heat embossed.
The second project was for the Book of Me Challenge. The challenge was to create a layout about how you spend your day. This Wednesday will be my last day working in the Child Center at Lifetime Fitness, a job I have held for 4 years. I decided to make a page with the schedule of my morning on days that I work at 8:00 AM.
The final project is a card for the May Cards Challenge. The challenge was to make a shaped card (not square or rectangle). I used my Cricut and "Stretch Your Imagination" cartridge to create this card. The watering can flips up to reveal the inside of the card.
Monday, May 24, 2010
Monday, May 17, 2010
Scrap Mania!
On Saturday I spent the evening at Archiver's at Scrap Mania. It was a lot of fun to get away for a few hours and just concentrate on scrapping. I didn't win any of the prizes, but the page kit featured Basic Grey "Max and Whiskers" which is a really cute line, even if you don't have pets. I completed 1 2-page layout, 1 1-page layout and a card.
This layout was based off of the March Sketch at Challenge Masters. I had to make myself stop adding things because I struggle to leave this much white space. When I got home and showed Rick, he asked me if I was finished. He asked, "So you made a 12x12 page and put it on two. Hmmmm.... could he be contributing to my white space issues? :)
Then I made this card for my sister-in-law and brother-in-law as they welcomed a new baby to the family on Mother's Day. I did this one for the May Stash Challenge at Challenge Masters. The challenge was to use the scraps from a project you recently completed. As you can see, I used scraps from my layout above. I also used the May Card Sketch from Sketches: Creatively Yours.
Finally, I made this layout for the May Go Green! Challenge at Challenge Masters. The challenge was to use just one piece of paper for the base and one piece for embellishments. The paper I used for embellishing was double sided, which is how I got the two different patterns. The only other products I used were chipboard letters, a few rubons, and some rhinestones.
In other exciting news, I just got an e-mail today that two of my layouts are going to be in the July issue of Scrapbooking.com! This is the first time I have been published with them, so I am pretty excited!!
Friday, May 14, 2010
Yipee!!
A couple of my layouts have been recognized on the Scrap That Baby! blog! I am very excited! The prompt was to create an Easter layout of your child who is 4 and under. I entered the two I did a month or so ago. You can see my post with them here.
I am going to ScrapMania tomorrow night so I hope to have some new layouts to post in a few days. Have a great weekend!
Sunday, May 9, 2010
Happy Mother's Day!
Happy Mother's Day to all the moms out there!! My day has started out a little rough, but I am hoping after a nap (for everyone) things will go a little more smoothly.
I some cards a few days ago for my mom, mother-in-law and grandmas for Mother's day. I made two styles- one for my mom and mother-in-law and one for my grandmas. Both were created using the sketch from the PageMaps blog American Crafts Letterbox Card Contest. Here is my first take:
I wasn't fully satisfied with that and I wanted to try it again (and I wanted to use the alcohol inks I bought last weekend) so I made this one:
Sunday, May 2, 2010
May Calendar Challenge
This morning I posted the Calendar Challenge for May at Challenge Masters. Here it is:
Your challenge for the month of May is to use a monogram and a photo collage on your calendar page. Your photo collage may be digital or created by hand after you have printed your photos. There are some great free photo collage template downloads at Scrapbooks Etc. I used one of theirs for my layout below.
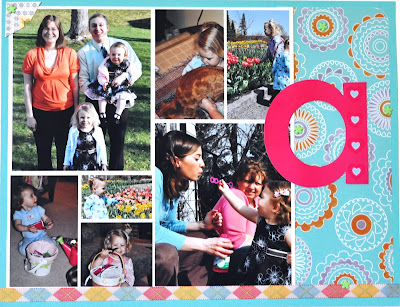
Here is a tutorial on how to put your photos into a template using Photoshop Elements. (I have version 2.0, so some of the functions may be different and it may be easier for those of you with a newer version.)
1. Open your template in PSE.
2. Select "Save as" and save it with a new title so you don't mess up the original template.
3. Open the photo you would like to place in the template.
4. Drag it into your template file using the move tool.
5. Shrink your photo to about the right size. (You probably won't be able to get it exactly right without some distortion because the SBE templates have odd sized photos.)
6. Use the rectangle marquee tool and select the area on the template that you would like to fill with your photo.
7. Use the move tool to move the marquee you created over the photo to select the part that you would like to keep.
8. Choose the "Inverse" command in the "Select" menu.
9. Press "Delete". This should eliminate any part of the photo outside the marquee.
10. Use the move tool to place your now cropped photo where you want it in your collage.
11. Choose "Inverse" from the "Select" menu again and use the arrows to nudge your photo into the exact right place.
12. Choose "Deselect" from the "Select" menu.
13. Repeat steps 3-12 for each photo.
14. When all photos are in place select the layer with the collage in it and delete it so you don't have any blue peaking out along the edges of your photos if they aren't exactly the right size.
Saturday, May 1, 2010
I'm a Scrapping Maniac!
I completed two NSD challenges today over at Challenge Masters. The first was the card challenge. The challenge was to make a card using a shaped edge, whether that be die cut paper or a border strip or punch; an embellishment cut from scrap paper; sentiment made from stickers; and a scrap of ribbon. I made this card to attach to the May Day bag I delivered earlier today. It was for a 3 year old boy, hence the snail.
The second challenge I completed was the Technique Challenge. This challenge was to use Glimmer Mist and a screen or mask. I had a lot of fun with this one, even though I'm pretty sure I ruined a pair of pants in the process...
Happy National Scrapbooking Day!
I hope you are all having a wonderful day. I have a few projects to share today.
First is a baby shower card I made for a coworker using the Color Challenge at Challenge Masters. The challenge was to use at least 3 of the following colors: Yellow, Blue, Spring Green, Grass Green. I used the first three for my card.
Next is the Recipe Challenge I created for the Challenge Master NSD Crop. Here it is:
S= stamp
C= chipboard
R= ribbon
A= acrylic
P= patterned paper
Above are the items you must use. Along with that you must use 1-5 of each of those items (each number only once). For example, for my page I used:
3 stamps- 1, s, t
5 pieces of chipboard (the flower outsides and centers are separate pieces)
2 ribbons
1 acrylic accent
4 different patterned papers
After I posted the challenge I realized that I had used an epoxy accent instead of acrylic, so the "acrylic" part of the challenge is to use an accent that is "plasticy".
Finally, I did the progressive Build a Page Challenge that Janet posted for NSD. She had 9 separate directions and we had to complete each step before even looking at the next. I have never done one of these before, but it was a lot of fun. Here is my finished layout.
Stay tuned, tomorrow I will be posting a new calendar challenge at Challenge masters!
Subscribe to:
Posts (Atom)