Monday, October 31, 2011

Photo Scavenger Hunt 10-30-11

I got my photos done for the scavenger hunt again this week! I got to capture some more fall fun!

Macro


Found Texture
Will had a blast playing in the leaves!!


Home
We spent Saturday at home, decorating pumpkins, cleaning up the yard and playing in the leaves.


Cover
Ellie wearing her helmet.


Tree


Tuesday, October 25, 2011

I Heart Faces: Let Them Be Little

I couldn't pass up participating this week at I Heart Faces, I have 3 little ones after all! This photo is from the apple orchard a few weeks ago. Will LOVED the cats! He followed them and squealed every time he got close to one. I think this photo really captured his glee.


Sunday, October 23, 2011

Photo Scavenger Hunt 10-23-11

I managed to pull together some photos for this weeks Photo Scavenger Hunt at Ramblings and Photos. A couple of the photos are from a couple of weeks ago. I've realized I may need to get the camera out a little more again!

Words
Addy's birthday cake for her party today. I have to say this is the best my "writing" has ever turned out on a cake!


Under
We spent some time at the zoo on Friday. The Amur leopards are my favorite!


Orange
This one is from our trip to the pumpkin farm a couple of weekends ago, I love how excited Will is!


Fly
They may not be in flight, but they do fly... This is from the marina in Lake City a couple of weeks ago.


Always Look on the Bright Side
Addy getting ready to blow out her candles!

Thursday, October 20, 2011

My Little Gnomes

I haven't been doing a lot of scrapbooking lately because I was working on Halloween costumes for my girls. When the costumes were put out on the shelves at Target, I spotted this one and asked Addy if she wanted to be a gnome for Halloween. She immediately agreed. I thought I could make a costume for less than the $20 price tag on this one, so we took a trip to JoAnn's and bought the supplies- green and pink felt, green and pink thread (the most expensive part!), some elastic, Stitch Witchery, and ribbon. We also hit the thrift store in search of some plaid shirts. I couldn't find long sleeved ones, but I figured they could wear a long sleeved t-shirt under these if it is cold. I spent a couple of nap times sewing and then using the Stitch Witchery and an iron to attach the flowers. I couldn't find suspenders so I just used some ribbon and safety pins to make theirs. Here are the costumes:


I should mention I didn't use a pattern for the skirts or hats, I did a Google search and was able to find directions on how to make both- for FREE! I found the directions for the skirt here and the directions for the hat here.

Thursday, October 13, 2011

Multi Photo Challenge

This month at Back Porch Memories, Crystal's challenge was to use 8 or more photos on a layout. I knew I should have at least one set of photos for that challenge and I did! These photos are from the 4th of July, 2010. That is me in the white shirt, VERY pregnant (it was 5 days before Will was born).

I used a Crafter's Workshop template and some blue and red Glimmer Mist for the "fireworks" in the corners. I realized after I did the first color that I should have masked beyond the edges of the template, but there was nothing I could do at that point, so I decided to embrace the overspray.

Tuesday, October 11, 2011

Photo Scavenger Hunt 10-9-11

Last week's prompts really spoke to me, and with the amazing weather and beautiful fall colors, I had lots of photo ops. I'm late to the game getting these posted, but I took the last shot yesterday.

Landscape
I took quite a few landscape photos this week to capture the beauty of fall, but this was one of my favorites, taken at the Minnesota Zoo.


Complementary/ Triadic Color
I struggled with this one, It is really hard to take a photograph containing only 2 or 3 colors!


Black and White
This photo isn't a true black and white photo, but it doesn't get more black and white than a penguin! I left a bit of color in the photo to give it a little warmth. On a side note, Addy said she thought this guy looked like a Grandpa Penguin, I tend to agree. :)


Food
We made a trip to an apple orchard and a pumpkin patch this week. Here is one of my girls picking an apple.


Blank Space
This one is from the pumpkin patch. This is my oldest daughter as we waited for the hay wagon to pick us up for a ride.

Monday, October 10, 2011

Scrapfest Stamping Technique #3

It is Monday again! I am back with the last technique I learned in the Hero Arts class (taught by Jennifer McGuire) at Scrapfest.

For this technique you will need:
Versamark or embossing ink
white embossing powder
white cardstock
Clear shimmering spray ink (I used Pearl Glimmer Mist)
2-3 colors of Distress inks (I used Dusty Concord, Chipped Sapphire, and Barn Door)
Clear stamps (you are going to want images that somewhat symmetrical)
A plastic plate (or we used one of these in class)


Step 1
Ink up your stamp with the Versamark and stamp on cardstock. You can use more than one image if you like. (Ignore the redness of my stamp, it was stained when I used some red chalk ink.)


Step 2
Cover images with white embossing powder.


Step 3
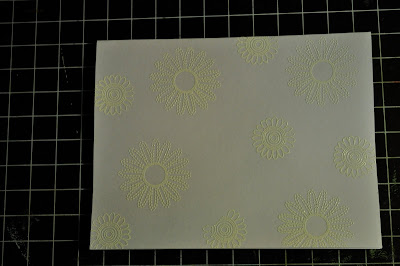
Heat embossing powder. Here is mine after it was heated. You can see that the powder has melted and become raised and shiny.


Step 4
Now comes the fun part! Press your inkpads onto the plate (or craft mat) in a triangle pattern, so that they are near one another.


Step 5
Spray 3-4 pumps on Glimmer Mist on the ink.


Step 6
Attach stamp to acrylic block upside down. You can see here that the image is toward the block.


Press stamp into ink. You can dab it a few times to get the colors to mix a bit.


Step 8
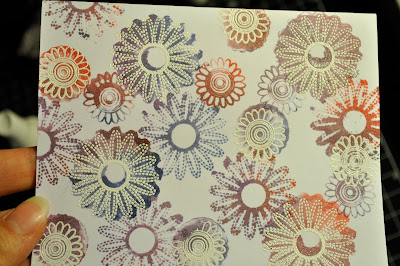
Stamp over the embossed images, the embossing will resist the ink leaving the image white and the surrounding area colored (this is why you want images that are somewhat symmetrical!).


Step 9
Flip the stamp back over and use the ink on the plate the same way to stamp the regular image.


Repeat steps 7-9 until you are satisfied with you paper.


Allow to dry and then embellish as you choose!


Here is the one we did in class using snowflake stamps.


Are there other techniques you have seen me use on my layouts or cards that you would like to see me demonstrate? Leave me a comment and I would be happy to do a tutorial- now that I have done it a few times, it isn't so overwhelming! Also, if you use this or either of the other techniques, please let me know and link your project so I can check it out!

Have a great week!

Friday, October 7, 2011

Sprinkler Fun

I made this layout last weekend when I spent a few hours scrapbooking with a friend- I really enjoy scrapbooking with others because it tends to force me to focus on scrapbooking instead of all of the other things that distract me when I scrap by myself.

Danielle at Back Porch Memories posed the challenge of placing something at an angle on your layout. I angled the large photo and then journaling tag. This layout is also a lift of Cindy Tobey in the January 2011 issue of Creating Keepsakes.


Thanks for stopping by and have a fabulous weekend!

Monday, October 3, 2011

Scrapfest Stamping Technique #2

It's Monday and I am back with my second (of 3) stamping techniques that I learned at Scrapfest. For this technique you will need:

watercolor paper
two colors distress inks or stain (I used Chipped Sapphire and Weathered Wood)
clear ink (I used Versamark)
clear embossing powder
heat gun
background stamp (or a stamp you can repeat to create a background)
clear Glimmer Mist (I used pearl)


Step 1
Use clear ink (Versamark or Embossing ink) to ink your stamp.


Here is my card front after stamping it, you can see the faint stamped image.


Step 2
Pour clear embossing powder over stamped images.


Here is mine, you can see the powder sticking to the ink.


Step 3
Heat the embossing powder to melt it. You will know it is melted when it gets shiny and raised. Here is what mine looked like after I heated it.


Step 4
Take your lighter color of inkpad (or stain) and rub it over the design in patches.


Step 5
Take darker shade of ink and fill in until the paper is completely covered.


Step 6
Spray the paper liberally (10-12 pumps) with Glimmer Mist.


It doesn't look great now, but just let it dry...


Step 7
(This step is optional)
Once your paper is dry, you may notice some of the ink pooled on top of the embossing and dried there. To remove it, simply spray with water once or twice and wipe with a tissue. This is what the final product looks like:


On a side note, you definitely want to use watercolor paper for this technique because it is more absorbent than cardstock. I tried this technique first with cardstock, and as you can see the ink bled when I sprayed it with the Glimmer Mist.


Now you can add whatever you would like to complete your card or page:


Here is the card we made it class as another example:


So, there you have it, another fun technique! Come back next Monday and I will have the final technique to share! If you try this or either of the other techniques, link up your project so I can see what you did!