Tuesday, May 31, 2022

More Cards

Hello, I am sharing two cards I made last week. I started with the same patterned paper and took it two different directions. For my first card, I had this chain link background stamp that I picked up on clearance a while back. I decided to make it look like there were some flowers growing through the hole and a butterfly on this side of the fence. I stamped the background stamp with Versamark, and heat embossed it in silver. Then I fussy cut the flower and butterfly, adding them to the card with foam tape. I stamped and heat embossed the sentiment on a coordinating piece of patterned paper and added it as a banner. 


For my second card, I had made a mistake when I was trimming the background, so I layered two pieces of patterned paper together and covered the seam with a piece of ribbon. I then stamped and heat embossed the cat and balloon on white cardstock. I then stamped the sentiment in the balloon. I used water color pencils and a water brush to color the cat and balloon. I fussy cut the cat and added it to my background with foam tape.  To add some sparkle, I used some yellow Stickles glitter gel over someof the leaves and one of the butterflies. I also added some orange sequins.


The cat stamp and glitter gel is from this month's Simon Says Stamp card kit. I am excited to make some more cards with this kit in the days to come!


Monday, May 30, 2022

June Calendar Page

Hi all! I have my calendar page for the month to share! I started with the Stick It Down double sketch:


I used the Crafting With My Gnomies collection from Photo Play for my papers and most of my embellishments. I used the B sides of the papers, which are more general themed and not crafty themed. I liked the "plaid" patterned paper for the background of my left page and decided to use black cardstock to make the bright colors pop on my right hand page. I stuck pretty close to the sketch, just dividing each photo spot into two to get more photos on my layout. For my title, I found this chipboard piece and punched out the letters. I used black paint for the big piece and spray ink in coordinating colors for the letters. Once all the pieces were dry, I popped them letters back in. I hand wrote my journaling on strips of cardstock. For embellishments, I used some stickers, washi tape, cut outs, and epoxy flair. I finished off my clusters with sequins. 


Thanks for stopping by to check out my layout!

Tuesday, May 24, 2022

Birthday Cards

It's that time of year again where I get to make lots of cards! Make sure to check back several times over the next 6+ weeks for card inspiration!

Today I have four birthday cards to share, two based on a sketch and two of my own design. First up is this sketch from Sketch Saturday:


I made two similar cards from this sketch. I started with a 8 1/2 x 5 1/2 piece of glossy cardstock and inked it with pink and purple alcohol inks. I started by squirting some blending solution over the paper and then dropping the color onto the paper. It didn't spread as much as I was hoping so then I took a blending tool and blended what was wet yet. This still didn't provide the coverage I wanted, so I put drops of color on a blending felt and swirled that over my paper. That finally gave me to the coverage I wanted. This first card was a special request and the recipient's mom said she likes bubbles, so I dropped blending solution over my background to give a bubble effect. Once that was dry, I went to work adding embellishments. I pulled out some scraps and went with a pink and silver/iridescent color scheme. I stamped and heat embossed the sentiment on the punched scalloped edge circle. I also punched the stars from iridescent glitter paper. I finished things off with some iridescent sequins. 

This second card is for my niece who just turned one. I used scraps to decorate this one too, but these were more colorful. I fussy cut the flowers from patterned paper to embellish the cards. I used my Cricut to cut the "1" and covered it in Stickles for some sparkle. I finished off the card with light green Nuvo drops.

Next up is a card I made for my son's 4th birthday. I used glossy cardstock and alcohol inks for this card as well. This time, I put the drops of color on the edge of my felt and drug it across the paper in a wavy pattern. The first waves I made were a little too big, so I took a second pass and made smaller waves. I like the layered effect this gives. I then splattered some blending solution and white mixative over the top to make a droplet effect. The focal point was a cut apart from an older collection that I edged with dark blue ink. I used my Cricut to cut "happy" for the front. I added the word "birthday" to the inside of the card.I finished the front of my card with glitter enamel dots and puffy heart stickers.

Finally, I have a card I made for my son's friend's birthday. I used the same "happy" as the card above (the cut actually cuts the word happy twice, so I just kept the second one for another card). I found some patterned papers in greens with silver accents and put the together for the background. I stamped and heat embossed "birthday" on vellum to layer underneath "happy." I embellished the card front with punched stars.  

Thanks for checking out my cards! I will have more in the weeks to come!

Friday, May 6, 2022

A Few New Cards

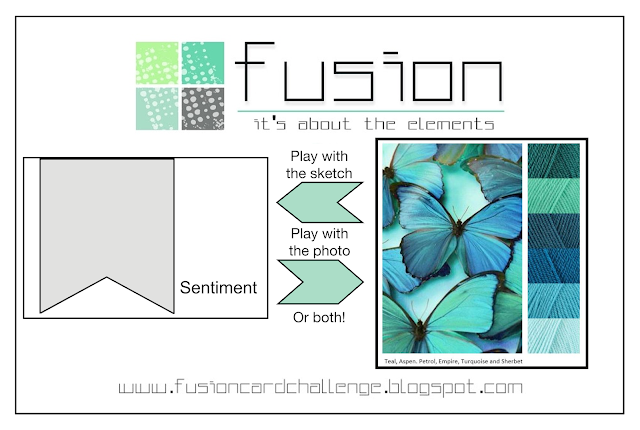
Hello all! I have some new cards to share today! First up is a set of Mother's Day cards I made for my mom, my mother-in-law and my grandmas. I was inspired by the current challenge at Fusion:


I'm a sucker for a beautiful blue color pallette like this, so I had to use it for my cards. It ended up being a little more green, but I got the butterflies on there. To make my cards, I started with a full sheet of white cardstock. I took a brayer and some green Distress Inks and rolled the ink onto my  paper. Then I pulled out a butterfly, dragonfly, and scroll mask. I laid them on the paper I had created and used a blending brush with green and blue inks over the mask. I then cut the paper into 4 panels. At this point, I felt the color scheme was too green, so I pulled out some blue spray mist and sprayed a few pumps over each panel to give it some more blue color. It had to added bonus of adding some shimmer. I then pulled out some patterned paper and stamped and heat embossed the sentiment. To add more butterflies to the cards, I stamped some butterflies on may banners as well and then attached them to my cards. I finished them off with some sequins. 


 Next up is a birthday card for my nephew. He is into KiMudo, so I found a Cricut cut that would work. I used some kraft cardstock and an embossing folder for the brick wall background- I really love the texture that folder creates! I cut and assembled my guy and cut a balloon as well. I stamped the sentiment and then drug the black inkpad over the string. Since the paper is textured, it didn't make it totally black and I needed to go over it with a black marker. I attached the balloon with foam tape for dimension. I finished things off with a few puffy stickers.