Thursday, March 26, 2020

April Calendar Page

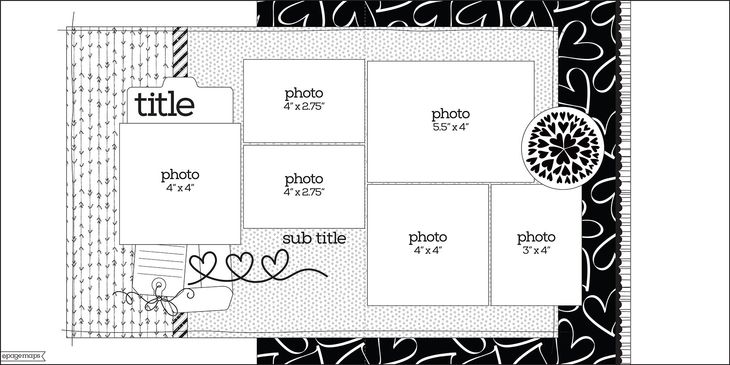
Hello, I have one more layout to share tonight. I completed my April calandar layout! I started with the double page sketch from Stick It Down:


I stuck pretty close to the sketch this month, just adjusting the shapes/sizes of the photos from what was suggested. I decided to make this page springy, even though we don't really see spring around here until May. I found some chipboard tulips and cut the red and yellow layered flowers using my Cricut (for the Bitten by the Bug 2 spring challenge). For some added texture, I penciled in some stems for my flowers and then stitched them with embroidery floss (for the texture challenge at Lasting Memories). I stamped the leaves and used silver Nuvo drops for the flower centers to finish off the flowers. The P and L in the title were actually orange, but the color was not working with my papers, so I peeled off the top layer and then traced the letters onto coordinating patterned paper. I glued the paper onto the chipboard pieces and sanded the edges to make it look like that's how they were made. I had more journaling than my card could hold, so I let it spill onto the page below. I finished off my page with some fussy cut butterflies with Stickles covered bodies and Nuvo Drop trails. (In case you are wondering, we using a charcoal mask product on our faces in the top left photo on the right hand page. ;))

Six- Sketches In Thyme

Hello and welcome back! I got some more scrapping done this week! This timee I started with this sketch from Sketches In Thyme:

As you can see, I rotated the sketch 90 degrees  to work with my photo. I wanted to work with black, white and pink to go with my daughter's shirt in the photo. I ended up pulling out a 6x6 pad I had with the pink. The large piece of black and white patterned paper on the left side of my page was an OLD scrap that I had been holding onto. It worked great for this layout. Once I got all my papers adhered, I splattered some pink Color Shine ink around my layout. For my title, I cut the number 6 with my Cricut from thin cardboard twice for some thickness and then patterned paper. I edges my title number and all of the smaller patterend paper pieces with black ink to soften the edges. I embellished the page with some dot and star stickers, a couple of printed chipboard pieces and some sequins.

Thanks for stopping by to check out my layout!

Monday, March 23, 2020

Merry Christmas

Hello again! I got another layout finished last week! This time I used one of the February sketches from PageMaps:

Sometimes when I have lots of photos, it's nice to have a sketch to start from, even if I don't follow it exactly, it gives me a place to start and prevents my pages from all looking the same! As you can see, I maintained a similar shape for where my photos were, but used more and different sized photos. I used my Cricut for the two ornaments and the word "Christmas." For the ornament on the right, I cut a second one without the stars cut out and put glue down and then sprinkled glitter over the glue to add sparkle to the ornament. Some of the glue got on the top layer, so to camoflage that, I covered the top layer with glitter glaze which added some shine and sparkle. I used the stars cut from that ornament around my page as embellishments, along with brads, a flair badge, and some gold liquid pearls.

Sunday, March 22, 2020

Birthday Cards

 Hello! I hope you are all staying in and staying safe! I made a couple of cards this weekend. I was inspired by the card sketch at Stick it Down for my first card:

I wanted to play with some masculine colors with the triangle turnabout stamp, so I started there and made a 6x6 piece that I cut into two pieces for two cards. I based my color choices on that striped patterned paper down the side. For the sentiment strip, I found some coordinating patterned paper and stamped the sentiment. I also stamped that cute little pig and colored him with colored pencils and then fussy cut him out. After attaching him to the card, I used off white liquid pearls on the ice cream cone and splatters for some added dimension. 

I took the other piece from the turnabout stamped piece and the same patterned papers and made a simple second card. This time I attached the pieces, used my sewing machine and stitched a frame around the whole thing and used gold liquid pearls to accent it.
Thanks for stopping by to check out my cards!

Saturday, March 14, 2020

Hello Autumn

Hello, I hope you are all staying safe and healthy! With a little one with a compromised immune system, we are in full lock down mode around here, so I've had some time to do a little scrapbooking! I put together this page for my daughter's book from the fall of 2012. 


The Studio currently has a challenge to use a grid design and Lasting Memories has a challenge to make a faux quilting design. I combined the two to creat this page. I cut 3x4" blocks and covered my pages. I then used a sewing machine to zig zag stitch between the blocks and photos to make it look like a quilt design. I didn't do much for embellishing since this is a pretty busy design already. I fussy cut the flower cluster in the bottom left corner and used my Cricut for the word "Autumn" for my title. I used gold sticker "hello" and stars scattered around the page. I finished things off with sequins and liquid pearls.

Friday, March 6, 2020

Falling for Fall

Hello! I have a new layout to share! I had printed these photos several months ago and they just happened to work with this sketch from Even More Scrapping:


As you can see, my photos weren't exactly what the sketch asked for, but they fit into the spaces! I used some stamps on this page, as well as some stickers, buttons and enamel dots. I had some fun putting together the title. I liked the little "Fall" word banner, so I worked from that. I used my Cricut to cut the work "Falling" and hand wrote "for. To give the area some interest and texture I used some splatter stamps before putting down all my pieces. The blue punched border actually had two rows of loops, but I cut off one of the rows to make it less "frilly." I really like how it turned out. I gave the squirrel and pumpkin stickers some dimension with some foam tape.
I also fulfilled the Lasting Memories Challenge to "mix and match patterned papers."