Thursday, June 27, 2024

Birthday Card- The Card Concept

Hello, I have another card to share today! I was inspired by the challenge at the Card Concept:

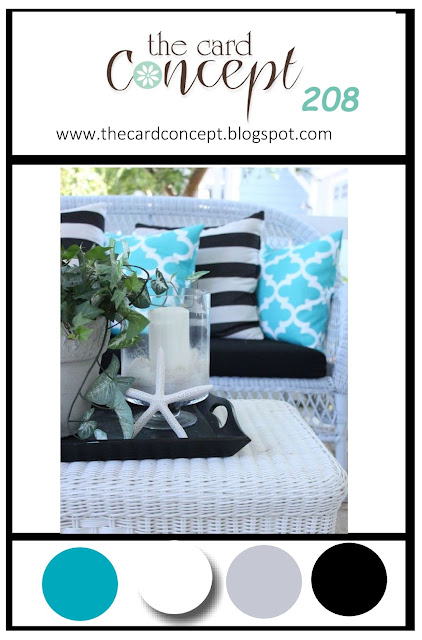
I love the colors in the inspiration photo, so I started with them. I used a set of layering masks to make the floral background panel. I then found some cardstock in a similar color and used a harlequin background stamp and the same grey ink I used for the blending. I liked the pattern on the pillows in the inspiration photo, this was the closest I had to that pattern. I then used my Cricut to cut the flower from the same color of cardstock. I inked the edges for some interest. I also used a shimmer pen on the grey circle to add a bit of sparkle. I layered a "Happy Birthday" banner over the top of the flower. Once I had all of that on my card front, I felt like it needed a bolder border, so I used a pen and ruler and drew the border around the blue cardstock panel.


Wednesday, June 26, 2024

Birthday and Wedding cards

I have a few more cards to share today! First up is a wedding card. This one came together pretty quickly. I started with a flower background stamp and silver embossing powder on grey cardstock for the background. I then stamped and heat embossed the cake and sentiment on vellum. I layered those over silver cardstock. I used a basic satin ribbon across the bottom to attach my sentiment and then added the cake piece to white cardstock to add a border.


Next I have a pair of birthday cardst I created. I started by using and blue ombre inkpad on the stripe background stamp and stamped that on white cardstock. I then used star punches and punched a bunch of stars from different red papers. I layered those over the stripes, concentrating them at the top and popping some up with foam tape. I stamped and fussy cut the sentiment banner and attached that over the stars. I added a thin red border around my panel before attaching it to my card.

 I used this week's Tic Tac Toe board and the right column: layers, stripes, bright colors.


Tuesday, June 25, 2024

Birthday Card- Sketch Saturday

Today I am sharing a card I created based on this sketch from Sketch Saturday:

I started with the fruit paper. I love how colorful it is! I found some green patterned paper that coordinated with it and used my Cricut to cut the tag and write the sentiment. This card is for my niece who is turning 5, so I had to add some sparkle with the glitter paper. I edged the tag with green ink to make it stand out against the fruit background paper. I fussy cut an orange slice from the fruit paper and covered it with Glossy Accents for a fun embellishment. To finish off the card front, I stapled a piece of ribbon to the top of the tag.


Monday, June 24, 2024

Birthday and Sympathy cards

Hello! I have been busy getting some cards made over the past week and I will be sharing them over the next few days. First up is this pair of cards I made using one 6x6 panel that I stamped using the Marble Turnabout stamp from Concord and 9th. 

I made this sympathy card using the sides that I cut off of the panel. I had some unstamped paper from the edge and I left that as a border. I used the same paper and ran it through an embossing folder to run down the center of the card. I used the same ink colors to stamp the butterflies that I then fussy cut and attached to the card front. For the sentiment, I stamped and heat embossed on a piece of vellum and attached that to my card.


My second card used the center part of the stamping that I had trimmed down to fit on a card front. I stamped some layered flowers and fussy cut those and used a piece of lace to anchor them. I stamped the sentiment on a piece of vellum and tore the edges. 
I used the current card sketch from Stick It Down for this one: 

Thanks for stopping by and stay tuned for some more cards!


Sunday, June 16, 2024

Birthday and Father's Day Cards

 Hello! I have some more cards to share today. For all of these cards, I started by stamping a background stamp on light yellow cardstock. I had inked up the stamps with the Hero Arts Serengeti Sunset Ombre inkpad. It created such a fun effect on all of the stamps!

First up, I have a birthday card. I used a chicken wire background stamp for this one. I thought it would be fun to create the illusion of a firework bursting through the hole in the fence. I cut the firework with my Cricut, once from orange cardstock and two more times from white. I layered the pieces all together for dimension. I then stamped and fussy cut the sentiment on a the banner and attached that over the top of the firework. To add some sparkle, I used my finger to rub some Stickles gel over the ends of the firework and glued some gold stars ont he the background. To create the trail behind the firework. I sketched it onto my card with an orange pen.


Next up is this trio of Father's Day cards. Again, I started with the stamped background that I trimmed down to fit on a card front. I used my Cricut to cut the orange frames and then cut white cardstock circles to fit inside. I stamped the sentiment and then attached the frame. I attached them to my card fronts and added gold stars.
Thanks for stopping by to check out my cards!

Friday, June 14, 2024

Birthday Cards, Vol. 1

Hello all! It's been a while! My photography business has been busy, so I haven't had much time to craft and even less time to blog. I am here to share a couple of cards I made last week. I will be sharing more cards over the next few days. 

For these cards, I started with this color challenge from Color DareColor Dare

For my first card, I used this sketch from Sketch SaturdaySketch Saturday:


I rotated the sketch to make a vertical card. I started by stamping the background using the butterfly Turnabout stamp from Concord and 9th. I then trimmed the panel down so I could make two cards from it. I took the larger center piece for this card background. I used a scalloped circle punch and punched it from coordinating cardstock three times and stacked the circles. I stamped a solid butterfly in the center. I created a little flag for my sentiment and added it to my card. To finish off the card front, I wrapped some ribbon around it. I edged the card base with the same pink I used for my stamping.
For my second card, I used the edges I had trimmed off the larger panel and placed those down the sides of my card. I used some Core-dinations cardstock and ran it through my embossing machine and sanded the raised areas. I stamped and heat embossed the large butterflies and fussy cut them. I attached those and a stamped sentiment down the center of my card front. 

Thanks for stopping by to check out these cards, be sure to come back for more!