Tuesday, November 28, 2023

Towards the Sun

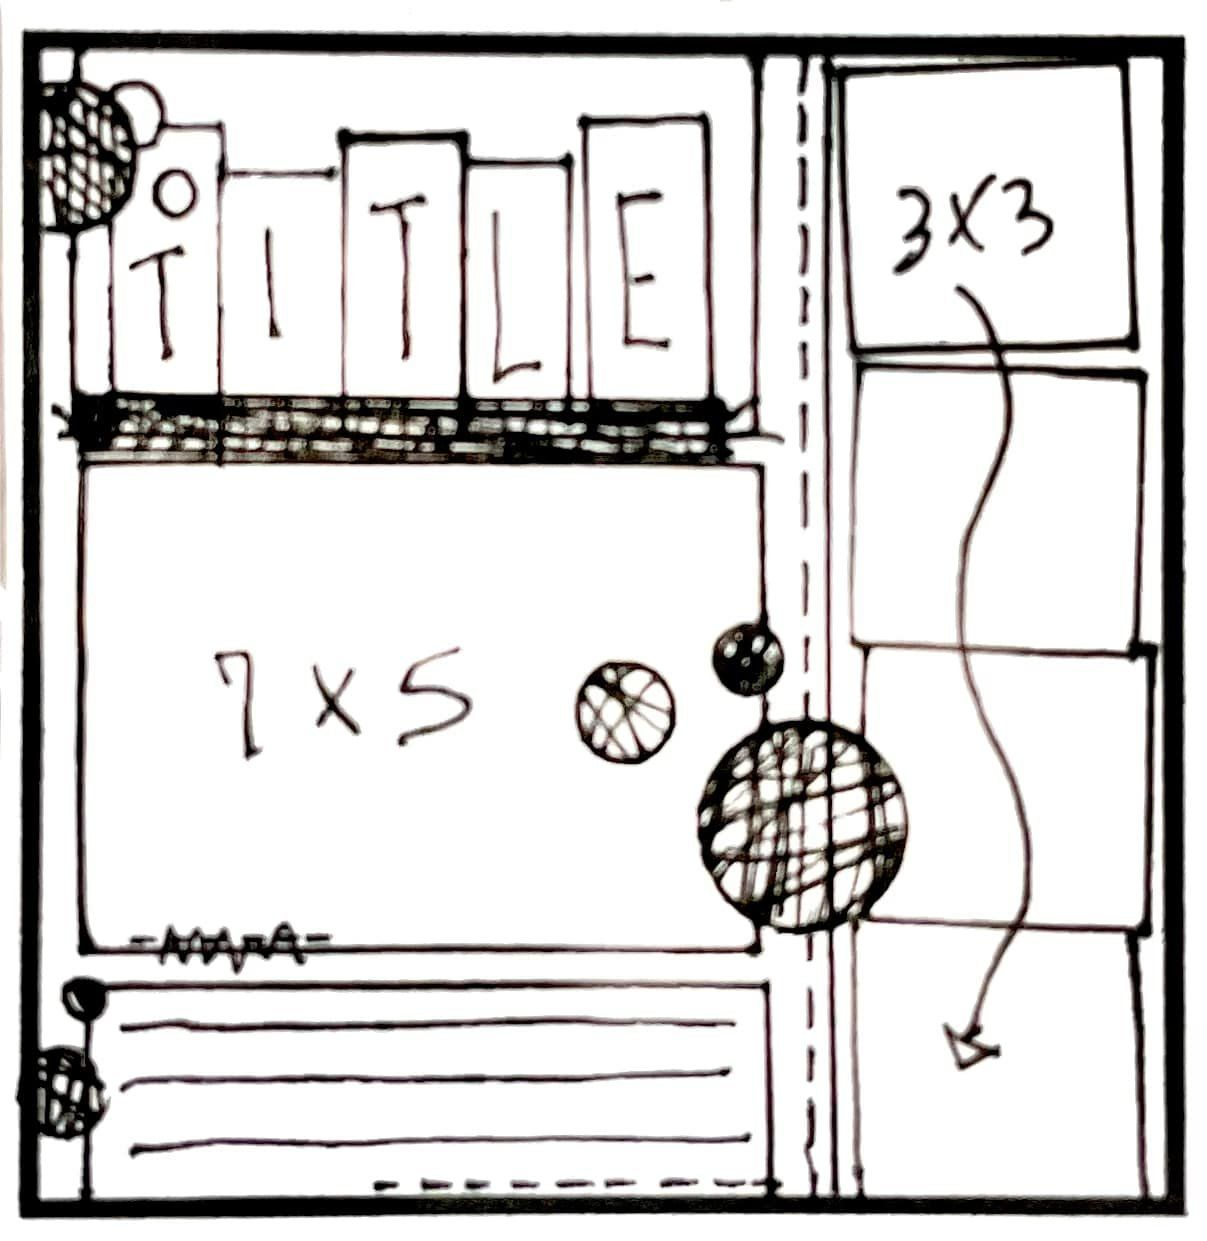
I have another new layout to share today! This layout started with this sketch from Paper Issues:

The sketch made me think of feathers, which made me think of these dance photos of my daughter. I started by cutting a bunch of feathers with my Cricut from glitter cardstock and glimmer cardstock. I then worked on some mixed media for my background. I used some Distress products and did the smooshing technique with some packaging. Once that was dry, I splattered some Glimmer Mists on the page. I then went to work attaching the feathers. I tucked both photos behind some of the feathers. I then cut a bunch of flowers using my Cricut. I edged all of the flowers with brown ink and curled them up a bit for dimension. I found a tag that coordinated with my colors. I also took a feather stamp and layered that in with the paper feathers. I put my Cricut to work again for the title, using rose gold cardstock. I have the sun mask from a kit and decided to use it here, adding the face on the top part of the layout and the rays around the word "Sun" on the bottom of the page. I embellished the flowers with a combination of enamel dots, gems, and Nuvo Drops. 


 I had a lot of fun playing with different techniques on this layout, thanks for stopping by to check it out!

Museum Hopping

Hello! I've had some time to create so I have a new layout to share! I started with the current single page sketch from Stick It Down:

My photos were a little different shaped, but I made the sketch work for them. I fussy cut the herringbone paper down the sides (I'm realizing now that you can hardly see the fussy cut part because of the photos 😆). I tore the edge of another patterned paper and layered it underneath. I added some texture to the background cardstock with some spray inks, both spraying and splattering them. For my title, I used my Cricut and cut the words from patterned paper and cardstock. For the word "museum," I cut the letters two more times from white cardstock and layered them to give the word a bit of dimension. I also used my Cricut to cut the gears from white cardstock. I used journaling stickers and image stickers to embellish the page. I finished off the page with some washi tape by each embellishment cluster to frame my photos and added silver brads to the middle of my gears.


Monday, November 27, 2023

Dan Patch Days

Hello, I have a new layout to share today! I started with this sketch from Sketches in Thyme:

I flipped the sketch since my daughter was facing the right in all of my small photos. I also used two photos instead of one for the large photo. I used papers from one of the kits from the Scraproom for September along with a very old sheet of patterned paper from my stash (copyright 2006 😱). I cut all of the patterned paper pieces and adhered them to my page. For my title, I used a font that had a rectangle around the letters. I wanted the letters to have a longer tab at the bottom, so I added and welded a small rectangle to the bottom of each letter. I attached the letters to my layout and added the small letter stickers to complete the title. The letters were blending in a bit with the background paper, so I outlined them with a matching pen. I then added some stitching with my sewing machine (which did not go smoothly). I didn't want to cover up the cute heart paper at the bottom any more, so I used vellum for my journaling. I stamped the lines and heat embossed them so they wouldn't smudge. I added some stamped splatters around the page and then added some watered down ink splatters as well over the top. To finish off the page, I used some stickers, puffy stickers and flair buttons. 

I am also entering this in the Lasting Memories Thankful for stamps and stickers challenge since I used a few of each on this layout.
 

Wednesday, November 15, 2023

More Cards!

I had to take a bit of a break from photo editing a couple of weeks ago to make some cards for some family celebrations. I'm not finally sharing them.

First up is a 40th birthday card that is very similar to one I made earlier this year, just using different colors. 


Next up is a card using a background that I created during the Simon Hurley class for SBC Fest. I simply cut the cake and stamped, heat embossed and fussy cut the banner and attached them to the ready made background. I used yellow Stickles gel for the "frosting" to finish off the card.


This was another card that I had the background already made way back when I made a bunch of teacher thank yous, I just added the die cut and created a shaker feature. To make the shaker feature, I used the shadow cut for the balloon and cut it from clear stiff packaging. I glued the die cut on top and then cut foam tape into thin strips and adhered it behind the outline of the balloon. I filled the well created by the foam tape with sequins, beads and glitter. I then pressed the card back onto the exposed adhesive. I finished off the card by gluing on a piece of embroidery floss as a string to the balloon.


Finally, I made an anniversary card using a scrap from the background stamped for the first card in this post. I stamped and heat embossed the flowers on the background cardstock and also stamped and heat embossed the sentiment. I added a strip of gold foil cardstock to the seam between the two parts. With the sentiment on the right, it needed a little something on the left, so I added the three red mini brads.

 Thanks for stopping by to check out my cards!

Tuesday, November 14, 2023

November Calendar Page

Hi all! I finally got my November calendar page finished! I used the two page sketch from last month at Stick It Down:


I started by pulling out white cardstock for my background, but once I started looking at the patterned papers, I decided kraft would make them stand out more. I cut the banners from scraps of patterned paper in the P13 fall collection from last year. I had one open spot that I used a journaling card in the place of a photo.I used my Cricut to cut the frames from a coordinating orange patterned paper.  I also used my Cricut to cut the title. I printed my journaling out and cut it into strips. To embellish the page, I used some Elle's Studio tab and word stamps, some Echo Park brads and chipboard pieces, and cut a couple of leaves from the P13 collection. To finish off the page, I splattered a bit of Tattered Angels Golden Terra Cotta ink around my embellishment cluster and title. 

 I am entering this in the Lasting Memories Thankful for die cuts challenge since I used my die cutting machine for the two frames and the title on this layout.

Monday, November 13, 2023

Sketch Saturday- Oh Happy Day card

Hello! It has been a while! I have been busy taking and editing family photos. I am finally caught up and able to play with paper (and post about it) again. First up is a card I made that was inspired by the current sketch from Sketch Saturday:


I pulled out scraps for this one since I needed some strips. I ended up finding mostly October Afternoon scraps. I trimmed the down and attached them to a black cardstock panel. I then stamped, heat embossed and fussy cut the sentiment. I attached it with foam tape for a bit of dimension. I then punched some stars from silver foil and iridescent foil cardstock. I layered those on either end of the banner to finish up the card.