Wednesday, June 29, 2022

More Cards

It's June so that means lots of cards on this blog! I have three cards to share today. 

First up is a graduation card. The design is very similar to the graduation card I shared a couple of weeks ago, I again used school colors.

This is another tried and true design. I used my floral Turnabout stamp and shades of yellow and white on cream cardstock for this card. The Turnabout stamp makes a 6x6 panel, so I cut it in half and trimmed it to fit on a 4 1/4 x 5 1/2 card. I then added a piece of gold glitter cardstock and a punched yellow cardstock border to the bottom of the card. I used the coordinating stamps to stamp a couple of flowers to embellish the card. For the sentiment, I stamped and heat embossed the word "Happy" and cut the word "birthday" from cream cardstock. I stacked the cut outs for dimension and then brushed pearlized ink over the word for some shimmer. I finished off the card with some clear gems.


My last card used up some scraps and premade bits I had laying around. The background is made of strips trimmed off of inked backgrounds. I attached them to a piece of cardstock trimmed to the right size and then clipped off the excess. The sentiement was already stamped on the punched circle, so I added them with some foam tape. The stars were also already cut, but I did add some yellow Stickles gel for some sparkle. Once those pieces were attached, I decided I wanted to add a bit more so I stamped and water colored the little puppy and balloon. I attached that with foam tape as well.

 Thanks for stopping by to check out my cards!

Tuesday, June 28, 2022

Happy Birthday Car Card

Hi all! I have a new card to share (and a few more to share tomorrow)! I was inspired by a couple of challenges for this one. First, I used the current sketch from Sketch Saturday:


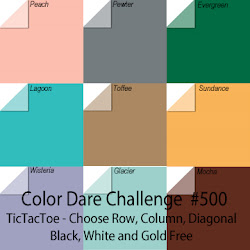
I was also inspired by a new challenge blog I discovered: Color My Heart Color Dare. The challenge was a tic tac toe challenge using this chart:


I used the center column for my card. I started by doing the smooshing technique with a couple of colors of blue ink on my kraft background cardstock. Once that was dry, I found some patterned paper scraps in coordinating colors and cut strips to put on my background. I cut the card using my Cricut. For the sentiment, I stamped it onto a piece of matching cardstock and glued it onto my card front. I used silver brads for my "hubcaps."


 Thanks for stopping by to check out my card!

Sunday, June 12, 2022

Happy Anniversary- Fusion

Hello again! I have another card to share. This time I was inspired by the new challenge at Fusion:
This inspiration photo is so pretty and I thought it was perfect for an anniversary card. I started by pulling out a piece of white cardstock and dry embossing it with lines to mimic the boards in the photo. I then found a piece of tan cardstock and stamped it with a script background stamp in brown. I then went to work looking in Cricut Design Space for circles to cut out. I found these polka dot wreaths and cut them from dark brown cardstock. I also pulled a couple of colors of green and cut the leaves. I glued them onto the card. I then stamped my sentiment on vellum, trimmed it and attached it to the card. To finish off the card, I used gold Liquid Pearls on the leaves, Dirty Bronze Nuvo drops on the circles, and clear sequins scattered across my background for some sparkle.


 Thanks for checking out my card!

Saturday, June 11, 2022

Father's Day- Sketch Saturday

Hello! I have two new cards to share today! For these cards, I started with this sketch from Sketch Saturday:


I also worked again with the June card kit from Simon Says Stamp. I used the enclosed green cardstock and the patterned paper with the cute little scenes. I found two scenes that I felt fit Father's Day and trimmed them out of the paper. I rounded the corners and matted them on dark blue cardstock. I found some patterned paper scraps that coordinated. To add interest to the background with an embossing folder. Before I placed the paper in the folder, I used a brayer to roll some yellow Distress Oxide ink into the folder. That made my indentations yellow. I added my scenes with foam tape for dimension and added a little twine bow to the top. I stamped the sentiment on grey cardstock and trimmed little banners. 


 Thanks for stopping by to check out my cards!

Saturday, June 4, 2022

Cards!

Hi all! As promised, I have several cards to share! These weren't done for any particular challenge, I was just playing around with what I have. 

First up, I made this card with the June card kit from Simon Says Stamp. I saw this example from Nina Trapani and wanted to try to emualate it:


As you can see, I made a narrower card with the same patterned paper. I used the stencil and orange and yellow Distress Oxide inks to make the sun. Then I went over that with the yellow Stickles gel that was included in the kit. For the sentiment, I wanted wood grain paper to match the tree. I didn't have any in the right color, so I made my own! I used brown paper and I used the Tim Holz wood grain stencil with a few colors of brown ink. I made a few layers of ink. Then I stamped the sentiment with yellow Distress Oxide ink and embossed it with clear powder. The sentiment blended in a little too well with the brown, so I took some more brown ink and blended it over the sentiment to make the background darker. Finally, I took a towel and rubbed off any excess ink on the heat embossing.


Next is a graduation card. I wanted to use my Cricut for this one, so I found the hat and "Congratulation cuts. For the background, I used a star stencil and modeling paste mixed with silver gelato. I usually keep my graduation cards pretty simple and try to use the graduate's school colors. I really like how this one turned out!


Finally, I have an anniversary card. When I made the second card in this post, I didn't want to throw away the insides of the flower die cut, so I decided to use them for a die cut inlay technique. I cut the flower from red cardstock and layered that over the black shadow cut. I then took each piece from the gold cut and glued them into place in the red flower. It was a bit of a slow process, but it turned out so pretty and I got more use out of my sheet of specialty paper! For the background of this card, I used a herringbone background stamp and stamped it with Versamark on black cardstock. I then heat embossed it with gold powder. I used some foam to attach the flower for dimension. I stamped the sentiment in white ink and heat embossed it with red powder and then cut the banner shape. I used a black gem for the center of the flower (not pictured here because it had fallen off, it has since been reattached).

 That's all for now, thanks for checking out my cards!

Friday, June 3, 2022

Birthday Card- Fusion Card Challenge

Hello! I have a new card to share. I was inspired by the current challenge at Fusion:


How pretty is that inspiration photo? I had to work with this one! I used my MISTI so I could make two cards since I need lots of cards this time of year. I placed the individual stamps on the MISTI and stamped each color separately, working my way across the card. Once I had finished the stamping, I decided it was a little too stark, so I took a blending brush and lightly brushed each of the ink colors across the card to soften the look. I then cut out the cupcake using my Cricut. For the band element, I wanted something somewhat transparent so you could still see the stamping. I found this rainbow ribbon in my stash and decided to use that. The "Happy Birthday" banner was then stamped, heat embossed in gold and fussy cut. To add some interest to the card, I used Glossy Accents on the heart, sequins for the flower middles and Stickles for the party hats.


 Thanks for stopping by to check out my card, there are more to come!