Pages

Thursday, December 29, 2022

January 2023 Calendar Page

Hello all! Can you believe 2022 is almost over?? I am here today with my January 2023 calendar page! I started with the double page sketch at Stick It Down:


I stuck pretty close to the sketch on this one. I bought a Christmas Warehouse box from Simple Stories and these are some of the goodies from that box! I started by selecting my patterned papers and die cuts and laid them out on my layout. I used my Cricut and some coordinating cardstock to make the large doily on the left hand page. A journaling spot worked perfectly for my journaling for the month on the left side of my layout. I found some foam Thickers that matched perfectly, so I used those for my title. To mimic the lines down to the ornaments on the sketch, I dripped spray ink down my layout. I think it gives the effect of icicles. I finished off my layout with some brad stickers and Nuvo Drops.

 Thanks for checking out my layout!

Tuesday, December 27, 2022

Birthday card- Stick It Down

Hello again! I have another card to share today. This time it is a birthday card based on the card sketch this month at Stick It Down:


I used this opportunity to use up some scraps for my card. I pulled blues and greens that went together and went to work cutting strips. I used an embossing folder on the background. I then glued the strips down. I stamped the sentiment on a strip with a more subtle pattern before adhering the strip. To embellish the card, I punched some stars and glued on some sequins. 

 Thanks for stopping by to check out my card!

Monday, December 26, 2022

Blessed Easter

Hi all! I have a new layout to share, and yes, I'm way out of season! 😉 These are the photos I have printed right now!

I was inspired by the Love Your Stash Challenge at Lasting Memories: Create a layout and use 3 or more patterned papers, stickers (this can be any sticker - puffy, chipboard, or cardstock stickers), trim (washi tape, ribbon, twine, etc.), punches/die-cuts/ephemera, and finishing touches (enamel dots, brads, sequins, bling, splatters, etc.)

I used Bella Blvd. You Are My Sunshine collection for my papers. They are just so colorful and happy! I found some cut files for the title. For the word "Blessed," I cut the word once from the patterned paper and three times from white cardstock and layered them to give it some dimension. I wanted a border between my two blocks of patterned paper and I again found a cut file, this time a border and used coordinating papers to create it. For my journaling, I found a very old journaling spot and added it to my page. It had a heart in the upper left corner, which would have worked with my layout, but I decided to cover it with a die cut egg. To finish off my layout, I used some puffy stickers.

 Thanks for checking out my layout!

Sunday, December 25, 2022

Anniversary Card

Hello all and Merry Christmas! I have a Christmassy anniversary card to share today. It started with the inspiration image from The Card Concept:


I decided to start with a dry embossed wood background. I found a nice red to match the door in the inspiration. I then used my Cricut to cut the wreaths and sentiment. I attached the small wreaths directly to the background and used foam tape for the larger wreath. For my sentiment, I used pearl embossing powder on a white die cut. I attached the sentiment on both ends to the wreath. To finish off the card, I used pink Liquid Pearls and a short piece of twine to create a bow for my wreath.

 Have a wonderful day!

Sunday, December 11, 2022

Heat Embossed, Inky Backgrounds and Die Cuts

Hello! I have two new cards to share and they have similar designs. for both cards, I started by stamping  and heat embossing the background. Their paths diverged a bit from there, but then I finished them off with die cuts and small embellishments.

First up is an anniversary card. Since we are nearing Christmas, I decided to used this leaf heart background and go for a poinsettia look. I colored the heart with two colors of red/pink watercolor pencils and the used a water brush the blend the color. For the outer leaves I used two greens. To add a bit to the center heart, I colored around the leaves with a light blue watercolor pencil and then blended the color with a Wink of Stella shimmer pen. I used my Cricut and a couple of specialty papers to cut the sentiment. I finished off the card with some blue and green pearls and gems.


My second card is a birthday card for my nephew. I again began by stamping and heat embossing the background. I then pressed Distress Oxide inks onto the cover of my Misti and sprayed them with water. I pressed the panel into the ink and let it dry. I repeated this a few times to give the background depth. I again used my Cricut to cut the basketball and number. The number got a little to close to another cut that had been done in the paper and so the bottom right corner was missing, hence the punched star. I finished off this card with some iridescent foil stars.


Friday, December 9, 2022

16th Birthday Card

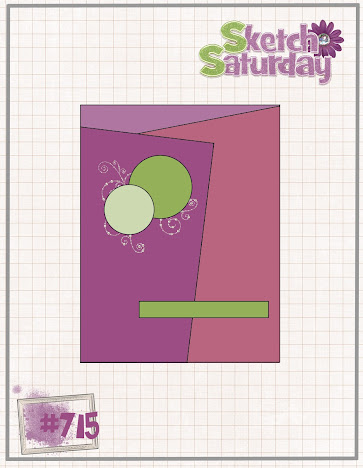
Hi all! I have a new card to share with you. This one was for my daughter's 16th birthday! I started with this sketch from Sketch Saturday:


I went through my scraps for the patterned paper pieces and found some that worked together. I used a sheet of silver paper and ran dry embossed it to look like tire tracks. For the keys, I cut them using my Cricut and then heat embossed them with silver 3 times to give them some depth and shine. I tied  some twine around the ring  and stamped and heat embossed the sentiment to finish off the card.